Passover time marks a kind of anniversary for us. Lillie was diagnosed with celiac disease 3 days before the holiday last year. Instead of finishing my preparations until 1 am, as most observant woman do in those few days before the holidays, my husband and I were on the computer learning about this disease, and what we would need to get through the next week or so. Aside from running out and buying a $13 box of gluten free oat matzo specially imported from England, most of the food had already been cooked. Some gluten free, made with potato starch, some laden with matzo meal. I quickly learned what I would have to separate out for her and what she could happily enjoy.
Passover is a dream for celiacs, stores are full of prepared foods made without wheat. Those items are generally prepared with potato starch and marked "non-gebrokts". There are items prepared with matzo meal, so like year round, one must read labels to be safe. Thankfully, companies have caught on to the revenue potential, and started marking foods "gluten-free". Now is the time to stock up. Well, maybe in another week and half to get the best prices. I remember my first post-Passover shopping adventure into the land of gluten-free. I was nervous. Passover had been one thing, we didn't allow bread, pasta or cereal in the house anyway. I felt, after that week long reprieve, that I had to now face the rest of my life-or rather Lillie's-in a world of gluten landmines. Like any good mother, I was prepared to do battle for my little girl.
My beret cocked at a determined angle, I felt like a tank commander leading her troops into battle, only the tank was a mini-van and the majority of my troops still pooped in their pants. I decided that surely every celiac in town would buy out the 50% off Passover items by the end of the day. So I left my house the day after Passover before the matzo crumbs were even swept off my floors. When I arrived at my local supermarket I found there was plenty left, and I went a bit crazy almost buying out the Passover display, now compacted from 2 aisles to a small display in the center of the floor. I starting tossing gluten-free salad dressing, chicken "shake n' bake" type mixes, potato starch noodles, cookies and cake mixes into my cart. Soon the boxes reached the top of the basket and started to spill onto the roof of the plastic car attached to the front of the cart. This great invention holds two small children, who can "steer" the car with fake steering wheels, while their parent blissfully shops in peace. The reality is for the parent steering this monstrosity, is equivalent to turning around an 18 wheeler in a cul-de-sac. The weight of the cart with 3 children and enough cake mix to last me an entire year was tricky. The items begin to slip and slide off the roof of the car and I kept stopping and re balancing like a house of cards, carefully trying to make it to check out.
Once home I cleared off a couple of shelves which I decided would be gluten-free only and neatly stacked my prized purchases. As you can see from my previous post, my supply served me well, and has lasted until this Passover. It was worth it to stock up at that time. The Passover cake mixes, on sale, are about 1/2 the price of those gluten-free mixes available year round. The boxes of cookies also went a long way. The salad dressing went rancid in November. Make sure to check expiry dates, and don't buy more than you realistically think you will use.
Many people have been hitting my site looking for Passover dessert recipes. Two majorly yummy and easy ones are below. I happened upon a bevy of easy dessert recipes on the Bakers Chocolate site that called for either little or no flour. The chocolate mousse looked especially tempting and easy to make. If the amount of flour is 1/2 cup or less, you can easily substitute potato starch. If you want to make the desserts non-dairy use pareve whipped topping.

Chocolate Chewies
from Gottlieb's Bakery in Savannah, GA
from Gottlieb's Bakery in Savannah, GA
from Cook's Country Magazine, April/May 2010, p. 32
The original recipe called for flour instead of potato starch. You can substitute coconut for the nuts if there are allergy issues. Unfortunately, there is no sub for the eggs in this recipe, but they are dairy free!2 1/4 cups confectioners' sugar
6 Tablespoons cocoa powder
2 Tablespoons potato starch
1/4 teaspoon salt
3 large egg whites
3/4 teaspoon vanilla extract
2 cups pecans, toasted and chopped fine
1 ounce bittersweet chocolate, grated
1. Adjust oven rack to middle position and heat oven to 325F degrees. Line 2 baking sheets with parchment paper. Mix confectioners' sugar, cocoa, potato starch and salt together in bowl of electric mixer. With electric mixer on medium speed, add egg whites to sugar mixture, 1 at a time. Add vanilla and beat for 3 minutes on high speed, scraping down sides as needed. Stir in pecans and chocolate.
2. Drop batter, 1 tablespoon at a time, onto prepared baking sheets, spacing 1 inch apart. Bake 1 sheet at a time, until cookies are dry at edges but soft in centers, rotating sheet halfway through baking, 15 to 18 minutes. Repeat with remaining cookie batter. Slide parchment onto wire rack and let cookies cool completely before peeling from parchment. Serve.
Yield: 2 dozen cookies

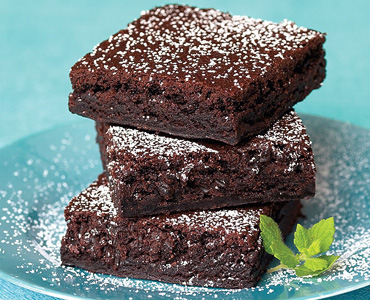
This is my hands down favorite Passover brownie recipe. I found it on the back of a box of Haddar brand potato starch one year. When Lillie had to start eating gluten-free, I made a copy of it and posted it inside my cabinet. It's a great "go to" recipe for all year.
If you don't have the chocolate called for in the recipe, you can substitute 3 Tablespoons cocoa powder, plus 1 Tablespoon oil for each ounce of chocolate. The 1 cup of chocolate chips in the recipe can be substituted with 1/2 cup cocoa and 3 Tablespoons oil.
Zev's Pesachdik Brownies
4 large eggs
1 1/2 cups granulated sugar
3/4 cup vegetable oil
3/4 cup potato starch
1 cup chocolate chips, melted
1 Tablespoon lemon juice
3/4 cup ground or finely chopped walnuts (optional)
Preheat oven to 350 F degrees. Spray a 9x13 baking pan with non-stick cooking spray or line with parchment paper.
In a large mixing bowl combine all ingredients. Mix well on high speed with an electric mixer, or by hand until thoroughly blended. Pour into prepared baking pan.
Bake for 45 minutes. Cut while warm. Cool on a wire rack. Store tightly covered.
Yield: Depends on how large you like your brownies!


No comments:
Post a Comment