Friday, December 20, 2013

Making and Baking

BS"D


This time of year the end of aisle displays include packages of flour and sugar stacked up like a brick wall, vanilla, scary looking red and green petrified fruit, and all manner of baking supplies. For those of us who bake for special diets, such as gluten free or vegan, our supplies are off the beaten path. Sometimes they can only be procured at health food stores or online. However, lately I have seen more and more options in the "regular" stores, such as millet flour, coconut sugar and agave nectar.  These new found conveniences can be put to good use with two great new "from scratch" cookbooks for special diets. The first in her continuing series, Laurie Sadowski presents gluten-free, dairy-free, egg-free and soy-free goodies in The Allergy-Free Cook Bakes Cakes and Cookies.  If you're hankering for the comforting smell and taste of home baked bread, try Gluten-Free Bread:  More than 100 Artisan Loaves for a Healthier Life by Ellen Brown .


The Allergy-Free Cook Bakes Cakes and Cookies by Laurie Sadowski takes no shortcuts, but yields wonderfully fresh tasting and flavorful baked goods without gluten, dairy, egg or soy---no easy feat. Baking both vegan and gluten free is a balancing act akin to the feats of Chinese acrobats. It takes skill and artistry, and if done right, the results are awesome. Laurie Sadowski has achieved this using fresh, real ingredients like millet and sorghum flours, coconut oil, avocados, tahini and flaxseed to create an array of cookies, cakes, bars and cupcakes. The recipes range from the familiar like Boston Cream Pie and New Old-Fashioned Strawberry Shortcake to Mini Triple-Coconut Cupcakes and Shortbread with Dried Cherries and Cacao Nibs. Being a Canadian, maple syrup figures prominently in Sadowski's book with the likes of Maple-Cinnamon Biscotti and Cream-Filled Maple Leaf Cookies.

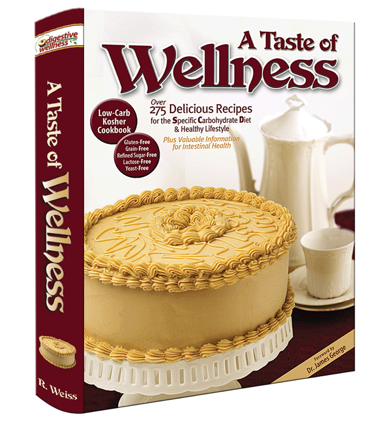
The recipes are clear, but the ingredient list can seem daunting. Don't be discouraged. Just gather your ingredients incrementally, and like any recipe, read through it first.  The other downside is I would have preferred more pictures of the actual desserts. The pages are jam packed with black and white pictures of bakeries from around the world, which is charming, but there are only a few of the actual desserts and several of the author in retro-50's housewife gear.  The bakery pictures, I suppose, are a nod to the international variety of recipes in the book, but I believe most people want an idea of what the finished dish will look like.

Lastly, the author provides a comprehensive explanation of ingredients, nutritional information for gluten-free flours, as well as tips to help you in this specialty area of baking. Overall it is a winner for the home baker who enjoys using quality ingredients for fantastic results.


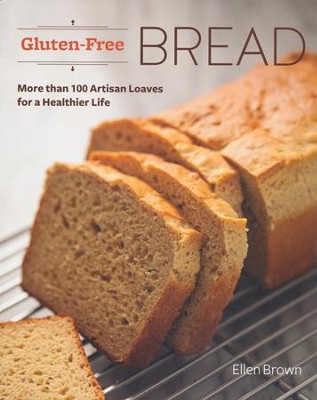
In Ellen Brown's new book, Gluten-Free Bread, the seasoned cookbook author has brought us a volume with an extensive array of breads, focaccias, bagels and almost all the savory, gluten-free baked goods one could want. From Muesli bread to French Baguette to Traditional English Dried Currant Scones, even Cornbread Stuffing-- this book has got it all.

Brown provides a thorough explanation of flours, yeast and the overall processes necessary to achieve great bread without the essential ingredient that makes bread so deliciously "bready"--gluten. 

The photography in Gluten-Free Bread is worth mentioning as well. Steve Legato's artistic photos give a clear rendering of what to expect from the finished product.

The recipes are clear and easy to follow. As the subtitle states, these are "artisan" recipes, implying they are crafted by those who care to take the time for a superior product.  I made the challah recipe in individual Bundts; each one really is enough for 2 servings. They looked adorable and tasted yummy straight out of the oven. Like most gluten-free breads, they are best freshly baked or warmed up in the oven.

Whichever book you choose, these make great gifts and are sure to keep the recipient occupied in the kitchen for a long time.


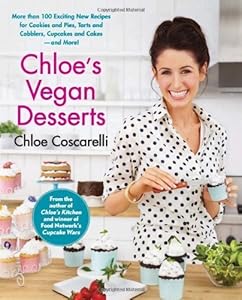
My kid's really liked this one. The real orange zest and juice give this bundt cake a really great fresh, vibrant taste.  I subbed all-purpose gluten free blend for the other flours in the cake, and it came out fine.

Chocolate Chunk-Orange Bundt Cake
The Allergy-Free Cook Bakes Cakes and Cookies by Laurie Sadowski, p.p. 30-31 (note: I have condensed the text of the recipe).

Cake:


1 1/4 cups sorghum flour, plus more for sprinkling the pan
1 cup millet flour
1/2 cup plus 1 Tablespoon tapioca flour
1/4 cup arrowroot starch
2 teaspoons baking powder
1 1/2 teaspoons xanthan gum
1 teaspoon baking soda
1 teaspoon fine sea salt
1 1/2 cups unrefined cane sugar
2/3 cup coconut oil, melted
1/4 cup finely grated orange zest (about 4 large oranges)
1/4 cup freshly squeezed orange juice
1 Tablespoon ground flaxseeds
2 teaspoons vanilla extract
1 3/4 cups vegan buttermilk (for each cup, mix 1 Tbsp. vinegar into non-dairy milk (i.e. soy or rice milk))
1 1/2 cups nondairy semisweet chocolate chunks or chips
1 Tablespoon cider vinegar

Orange Drizzle:
1/2 cup confectioners' sugar, sifted
1/2 teaspoon finely grated orange zest
2 Tablespoons freshly squeezed orange juice, plus more as needed
1/4 teaspoon vanilla extract

Chocolate Ganache:
2 Tablespoons nondairy milk
1  1/2 teaspoons coconut oil or vegan buttery spread
1/4 cup nondairy semisweet chocolate chips

To make cake:  Preheat oven to 350F degrees. Lightly oil a 10-inch (12 cup) Bundt pan. Sprinkle with sorghum flour, tapping out excess.

In a large bowl, whisk together first 8 ingredients.

Put the sugar, coconut oil, orange zest, orange juice, flaxseeds, and vanilla in the bowl of a stand mixer or large bowl. Mix on medium-low speed; beat until well combined.

Turn the mixer to low. Alternately add the flour mixer (3 additions) and buttermilk (2 additions), beginning and ending with the flour mixer, beating well after each addition. Turn off the mixer.

In a small bowl, toss together the chocolate chunks and 1 tablespoon tapioca flour, until well coated.  Add the chunks to the batter, stirring with a spatula until evenly distributed. Immediately stir int he cider vinegar until just combined.

Scrape the batter into the prepared pan using the rubber spatula. Smooth the top with the spatula.  Bake in the center of the oven for 40 to 45 minutes, until the toothpick inserted in the center of the cake comes out clean.  The cake will be golden brown, begin to pull away from the sides of the pan, and will spring back when lightly touched.

Let cool in the pan for 10 minutes, then invert the cake directly onto a serving dish. Let cool to room temperature before you prepare the drizzle and ganache. 

To make the drizzle:
In a small bowl, stir together the drizzle ingredients until smooth. Stir in up to 1 tablespoon additional orange juice, 1 teaspoon at a time, as needed to achieve  a runny consistency.

To make the ganache:
In a small pan, heat the nondairy milk and coconut oil over medium heat until the oil is just melted.  Immediately remove from the heat and stir in chocolate chips until they are melted and the mixture is smooth.

To assemble:
Spoon the drizzle and ganache over the cake, letting them run down the sides. The drizzle and ganache can be applied alternately or the drizzle can be applied firs,t then the ganache.  Serve at room temperature.

Store in a sealed container. The cake keeps for 3 days at room temperature, and 2 months in the freezer.

Yield:  12 servings


Popovers are a perennial favorite at holiday dinners. If you are dairy allergic, you can substitute soy, rice or help milk and non-hydrogenated margarine for the butter. However, they do require real eggs for their signature airy texture.


Popovers
from Gluten-Free Bread by Ellen Brown, p.p. 217-19

1/2 cup brown rice flour
1/3 cup potato starch
1/4 cup tapioca flour
1/2 teaspoon fine salt
1/4 teaspoon xanthan gum
1  1/4 cups whole milk, heated to 90F  or 38C) degrees
4 large eggs, at room temperature
3 tablespoons unsalted butter, melted and cooled

Pre-heat the oven to 400F (200C) degrees and grease a 12-cup popover pan or muffin pan.

Combine the rice flour, potato starch, tapioca flour, salt, and xanthan gum in a deep mixing bowl. Whisk well.

Combine the milk, eggs, and melted butter in a blender or food processor fitted with the steel blade. Blend until smooth. Add the flour mixture and blend until smooth.

Ladle the batter into the prepared cups, filling each two-thirds full.

Bake for 25 minutes, without opening the oven door. Lower the oven temperature to 350F (175C) degrees and bake for an additional 10 minutes, or until the tops are browned. Remove the pan form the oven and allow popovers to cool in the tins for 5 minutes, then serve immediately.

Note:  The batter can be made up to 4 hours in advance and kept at room temperature. Blend it again to distribute the ingredients before filling the cups. The popovers must be baked just prior to serving.

Variations:

Add 2 tablespoons of chopped fresh herbs (rosemary, thyme, sage and parsley) to the batter.
Add 1/2 cup freshly grated Parmesan cheese to the batter.

Yield: 12 popovers

Note:  The recipes below are not necessarily gluten free, but are part of a blogger link-up.

Thursday, December 5, 2013

Bake Someone Happy

BS"D

My first thought for a title for this blog entry was, "'tis the season...for allergic reactions". But, I felt that a bit too pessimistic, and chose instead an old Betty Crocker slogan--as I feel home baked goods do make people happy.  But, the fact of the matter the holidays are a minefield for those with food allergies and other special diets. Yesterday, I was sitting with another "allergy mom" recapping the Thanksgiving/Chanukah long weekend, and griping about how even those close to us don't seem to "get it", when it comes to food allergens. "Can you believe it?" she said, "they brought a nut cake into my house...a NUT CAKE...to me!" As you may have guessed, her daughter is nut allergic. On my end, I added that three, (3!), close relatives gave me treats for my children that had "may contain traces of peanuts", on the label.  Frustrated? You bet. And this is with loved ones. School parties, synagogue parties, friend's homes, are even more hostile territory. My children's school sent out a list of items they would be serving at their holiday party. Unfortunately, Lillie and Rosie could enjoy nothing more than the smell at the party, as every item posed a hazard for them. So that is why I would like to give the authors Ashley McLaughlin, Baked Doughnuts for Everyone and Jennifer Katzinger, Gltuen-Free & and Vegan Pie a big virtual hug for making sweet treats my celiac and food-allergic kids could enjoy.


Much has been spoken about in the past few weeks of "Thanksgivukkah", the amalgam of the first night of Chanukah and Thanksgiving falling on the same day--a rare occurrence. So the question was, do I make my traditional Thanksgiving pies, or do dougnuts, traditionally fried to commemorate the oil that lasted for 8 days on Chanukah? How about both?!


Gluten-Free and Vegan Pie  by Jennifer Katzinger, former owner of the Flying Apron, Seattles popular vegan bakery, is the fourth of her gluten-free/vegan cookbooks.  The book gives very clear instructions, both in writing and with stellar photographs to make the often tricky gluten-free/vegan pie crusts. The tempting recipes and  photos redolent with flaky pastry and ripe fruit for Apricot and Cherry Crostata, Maple Blueberry Pie and Strawberry Hand Pies, make one want to go on a pie baking binge. In addition, there are savory options such as Layered Eggplant Tarts with Pistachio Crusts and  Asian Pot Pie.

Pie crust is hard enough when you use non-gluten-free and vegan ingredients, and can seem near Herculean when trying to obtain flakiness and tenderness, while still managing to maneuver a top crust without breaking with these specialty ingredients. Ms. Katzinger presents a very easy method for single and double crusts using a brown rice flour and coconut oil based crust. She developed a method where she cuts the top crust into triangles or shapes, then chills them before placing on the top of the pie. This allows for maximum maneuverability and minimal breakage resulting in maximum wow factor! I also appreciate that her crusts do not call for eggs, as most gf pie crust recipes I have found do, since Rosie is allergic to them.

Whether baking a single or double crust, you can once again enjoy the pleasure of pies on a gluten and allergen free diet with this book.


I used a large flower shaped cookie cutter to cut out the top crust. I found it was easier to press the bottom crust into the pie plate instead of rolling it out.  As you work with the dough it may get soft and sticky as the fat begins to soften , and therefore difficult to roll out. One trick is to roll it out on parchment or silipat lined rimless baking sheet, so you can stick it back into the refrigerator to firm up as needed. Or, fill a 9x13 metal baking pan with ice cubes. As the dough softens, place pan on top of dough for a few minutes, and it will chill and firm up.

Traditional Apple Pie
from Gluten-Free & Vegan Pie by Jennifer Katzinger, p. 50, crust p. 11

I used the Double Pastry Crust recipe, while the author calls for her Darker Double Crust (p. 14) recipe.

1 Double Pastry Crust
3 pounds combined sweet and tart apples, cored and sliced 1/4 inch thick (I only use Granny Smith for pies)
3/4 teaspoon ground cinnamon
2 1/2 tablespoons arrowroot
1/3 cup evaporated cane juice
1/4 cup packed dark brown sugar
1/3 cup raisins
1 tablespoon vanilla extract
2 teaspoons lemon juice
1/4 teaspoon sea salt

1. Prepare the crust as instructed.

2. To make the filling, in a large bowl, combine the remaining ingredients. Let the filling sit for 30 minutes.

3. Spoon the filling into the prepared bottom crust. Roll out the top crust to cover the apple filling: Place dough on a well floured, parchment-lined firm piece of cardboard. Roll the dough to the a 10-inch diameter, then gently flip the dough over the filling. Crimp or flute he edges of the dough. With a sharp knife, make 5 evenly spaced 2-inch long slashes int he center of the pie radiating out like the spokes of a wheel. Place the entire pie in the freezer for about 35 minutes.

4. Meanwhile, preheat hte oven to 425F degrees. Place a baking stone or aluminum foil-lined baking sheet on the bottom rack of the oven.

5. Place the pie on the baking stone or sheet. bake for 15 minutes, then rotate hte pie 180 degrees and reduce the oven temperature to 350F degrees. Bake for an addition 1 hour and 10 minutes, or until the filling is bubbling and the crust is golden and firm. Let the pie cool for about 2 hours before serving.


Double Pastry Crust
ibid, p.p. 11-13

2 cups brown rice flour
1/3 cup tapioca flour
2/3 cup potato starch
1/3 cup arrowroot
1  1/2 tablespoons evaporated can juice
3/4 teaspoon salt
1/2 teaspoon lemon zest
1 cup plus 2 tablespoons refined coconut oil
2 tablespoons water
2 teaspoons vanilla extract

1. Place the flours, potato starch, arrowroot, evaporated cane juice, salt, and lemon zest in the bowl of a food processor and process just until the ingredients are combined. Add the coconut oil and pulse until the dough is the consistency of coarse meal with many pearl-size pieces.  Add the water and vanilla, and process just until the dough holds together.

2. Place the dough on a piece of parchment paper well dusted with brown rice flour.  Divide it into two portions, one slightly larger (about 2/3 of the dough) than the other; this will be the bottom crust. Shape the larger portion into a disc with your hands. Dust both your rolling pin and the disc with brown rice flour.   As you roll out the dough, rotate the paper so you roll in different directions to produces an 11-inch circle.

3. Working quickly, slip your hand under the parchment paper to lift up the dough and flip in into the pie pan. Using the palm of your dominant hand, press evenly and gently into the dough at the base of the pan while rotating the pan every so often.  This will create a thinner bottom crust and thicker side walls. Then press the extra dough into the rim with your fingertips to shape the edges uniformly.

4. Flute or decoratively crimp the edges of the dough. Pierce the dough all over with a fork to prevent air pockets from forming when baking, uncovered, and freeze it for 30-45 minutes before filling.

5. Roll out the remaining portion of dough to about 1/8-inch thickness to create the top crust, either cutting out hearts or other shapes, or creating wedges by rolling out the dough on the bottom of a 9-inch tart pan, trimming it to fit, and cutting it into wedges. Freeze the cutouts or wedges for 30 minutes.

6.  After the dough has been frozen, remove it from the freezer and fill the bottom crust according to your specific recipe.  To assemble the top crust, gently loosen the wedges from the parchment with a spatula and place each wedge next to one another, re-creating your circle. If you're using cutouts, proceed in the same manner.

Yield: 1 double crust

 
In the dessert trends of the last decade, Doughnuts lay somewhere between cupcakes and hand pies. Now baked doughnuts are in vogue due to the relative ease of making them, and the calories saved as compared to traditional fried doughnuts.  Essentially, it is cake batter poured into a baking pan with 6-12 doughnut shaped indentations, or a small electric machine that bakes doughnuts in less than 5 minutes.  Baked Doughnuts for Everyone by Ashley McLaughlin allows those of us who need to grapple with food allergies and sensitivities to enjoy this food trend to it's fullest. Not only does she have 101 delicious gluten free recipes, she has a whole section of vegan and gluten free options.

The recipes are truly unique and all tantalizingly tempting.  There are sweet flavors like the classic Chocolate Buttermilk to the more exotic Vegan Blood Orange and Green Matcha. Then  there are the more whimsical like S'mores and Baklava flavors. McLaughlin also ventures out of the box with savory doughnut recipes. How about Vegetarian Eggs Benedict on a savory doughnut?  There is even a recipe for Dog Doughnuts (that seem to be edible to their owners too)!

The book contains an explanation of the various gluten free flours used, and helpful tips for re-creating these bakery favorites at home.  The recipes are clear and have most awesome photos.  The author is a food photographer in addition to being a recipe developer.


My favorite recipe is for Jelly-Filled Doughnuts. Sufganiyot, or jelly doughnuts, are popular during Chanukah, however they are a big patchke (mess) to make. The McLaughlins baked version cooks with the jelly already inside, and makes for a simpler preparation.

So whatever you tickles your culinary fancy, pie or doughnuts, now there are options for everyone!


I found a very easy and neat way to fill the doughnut pans is to pour the batter into a disposable pastry bag, or gallon sized ziploc,  with a 1/2-inch cut out of the corner.  Pipe the batter directly into pans.

Vegan Pumpkin Spice Doughnuts
from Baked Doughnuts for Everyone by Ashley McLaughlin, p. 169

1/2 cup oat flour
1/2 cup sweet rice flour
1/4 cup plus 2 tablespoons pure cane sugar
2 tablespoons almond meal
2 tablespoons coconut flour
2 tablespoons ground flax meal
1  1/2 teaspoons cinnamon
1 teaspoon baking powder
1/2 teaspoon baking soda
1/2 teaspoon salt
1/2 teaspoon ginger
1/2 teaspoon nutmeg
1/4 teaspoon allspice
1/8 teaspoon ground cloves
1/2 cup plus 2 tablespoons unsweetened almond milk
1/3 cup pumpkin puree
3 tablespoons oil
2 teaspoons vanilla extract

For the Glaze:
1 cup powdered sugar
2 Tablespoons pure maple syrup
1/2 to 1 tablespoon non-dairy milk
1/2 teaspoon cinnamon

For the Doughnuts:

Pre-heat oven to 350F degrees, and grease a standard size doughnut baking pan.

Combine the dry ingredients in a  large bowl and stir until combined. In another bowl, whisk all of the wet ingredients together until fully combined.

Pour the wet mixture into the dry ingredients and stir with a large wooden spoon until just combined, being careful not to over mix.  Let sit for 5 minutes.  Do not stir after this point.  The batter will be very thick and not pourable.

Spoon the batter into the doughnut molds, filling to just below the top of each mold, 1/8-1/4-inch from the top.  Lightly smooth out hte top of the batter with a small silicone spatula. Do not pack the batter down.

Bake for 18 to 22 minutes until lightly golden brown around the edges.  A toothpick inserted in the center should come out clean. Let cool in the pan for 5 minutes.  Slide a thin spatula around the edges of the doughnuts to help loosen them out.  Then place on a cooling rack and allow to cool fully before topping.


For the Glaze:  Mix the glaze ingredients together until smooth.  Add more milk if a thinner consistency is desired.

Invert hte doughnut into the glaze, letting the excess drip off, or drizzle the glaze over the doughnut.  Let set until the glaze has hardened.

Yield:  8 to 10 doughnuts


Thursday, November 7, 2013

"Real" good food.

BS"D


It's November and I feel the starting gun for holiday shopping has officially gone off, although judging by the x-mas display at my Costco this August, it started earlier.  Each year there is renewed pressure to get gifts for our loved ones-- many of whom assure you they really don't need anything. Of course, we are loathe to show up empty handed. I think cookbooks are a great gift, not just because they are one of my passions, but also objectively I think they are useful. People seem to always be looking for new additions to their cooking repertoire. In the case of those on special diets, I find that especially to be the case b/c they have to start from scratch and re-build their repertoire of beloved dishes. A  nice touch is to prepare one of the dishes in the book and present it to your loved one in a nice pan or plate, which adds to the gift.


For the next couple of months, I will be reviewing some great gluten-free gifts (couldn't resist the alliteration), in the form of new cookbooks. To start with, I am turning to some wonderful, whole foods, from scratch style books.  Extraordinary Vegan by Alan Roettinger presents tantalizing, yet easy to prepare vegan dishes from appetizer to dessert.


What I like very much about Extraordinary Vegan by Alan Roettinger, is the clarity of the book. Not only the myriad of attractive pictures, but the recipes themselves are clear and lead to easy preparation. For those not familair with vegan cooking, which eschews the use of any animal products including honey, it can seem foreign and daunting. But Alan Roettinger puts it easily into one's grasp. Holidays like Thanksgiving which focus heavily on an animal as the focus of it's meal, can be a challenge for vegans and vegetarians. The ubiquitous Tofurky pops up in stores (btw not a gf item), but we can do so much better for our veggie-only -eating guests. From tempting starters like Miso Broth with Ginger and Avocado Relish with Preserved Lemons, to main dishes like Rajma Dal Bourguignon. The recipes are clear and mainly a page or two at most.  I made the stunning almond crusted Chocolate-Raspberry tart, that no one would guess was part of any special diet.

I recommend A Very Different Butternut Squash Soup and Carrot-Cardamon Rice with Saffron as alternatives to traditional Thanksgiving dishes. The rice is a great gluten free substitute for traditional bread stuffing.

A Very Different Butternut Squash Soup
p. 62-63 Extraordinary Vegan by Alan Roettinger

3 Tbsp. extra-virgin coconut oil
1 large yellow onion, diced
12 cloves garlic, minced
4 roasted red peppers, diced
1 small butternut squash, peeled and diced (about 4 cups)
2 small yams, peeled and diced (about 3 cups)
1 teaspoon sea salt
1/2 teaspoon smoked paprika
8 cups water
2 unsalted vegetable bouillion cubes
4 bay leaves
Pinch of saffron (optional)
1/2 tsp. hot read chili powder
Freshly ground black pepper
1 Tbsp. snipped chives, for garnish

Heat the oil in a large soup pot over high heat until fragrant, about 30 seconds. Add the onions and stir until they begin to soften, about 3 minutes. Decrease the heat to medium-high and add the garlic. Cook, stirring constantly, until the vegetables are nearly dry, about 4 minutes. Add the roasted peppers and cook, stirring frequently, for 2 minutes. Add the squash, yams, salt, and smoked paprika, and stir to mix well.  Add the water, bouillon cubes, and bay leaves. Increase the heat to high and bring to a boil. Decrease the heat to medium and simmer until the vegetables are very tender, about 25 minutes. Remove and discard the bay leaves. Working in batches, transfer the contests of the pot to a blender and process until smooth. Strain the soup into a clean soup pot and add the optional saffron and hot chili powder. Season with pepper to taste. Reheat over medium heat, stirring often to prevent scorching. Serve at once, garnished with the chives.

Yield: 8 servings

Carrot-Cardamom Rice with Saffron
 p. 102 Extraordinary Vegan by Alan Roettinger

1 cup basmati rice
1cup carrot juice
1/2 water
1 Tbsp. extra-virgin coconut oil
4 green cardamom pods, lightly crushed (a rounded 1/2 tsp. ground cardamom may be subbed)
1/2 tsp. sea salt
Pinch Saffron

Wash the rice in a bowl with water. This must be done very gently to avoid breaking the grains. Change the water frequently, until it runs clear. Drain well.

Put the rice in a small saucepan. Add the carrot juice, water, oil, cardamom, salt and saffron. Bring to a boil over high heat. Decrease the heat to low, cover, and cook for 12 minutes. Remove from the heat and fluff the grains very gently with silicone spatula. Serve at once.

Yield: 4 servings


Thursday, October 10, 2013

In a bowl....

BS"D

Today was the first real fall day with cooler weather and that distinctive crispness in the air without a hint of humidity. The swirling of multi-colored leaves falling from the sky is like confetti raining down in celebration of the lovely day.

Fall is the start of "comfort food season" in my opinion. I have memories of hot apple cider and cinnamon donuts at farm stands, pumpkin flavored everything, and homey soups.  Today I made a warming dinner in a bowl, and Lillie commented that she things in bowls taste so good. I wondered if that's perception or just that good things come in bowls...soups, ice cream, Asian noodles.

I hadn't tried cooking something new in awhile,  and I had kitchen "wanderlust" of sorts. I satisfied my urge with a braised chicken and leek dish served with rice. For some reason this dinner, which sounds very involved, actually ended up on the table sooner than some of my simpler "go to dishes". I felt a great sense of achievement and contentment for the perfect end to a crisp fall day!


Serve this "stoup", as Rachael Ray would call it, with rice or glass noodles. I used frozen, pre-sliced leeks, which made the process go faster.

Braised Chicken and Leeks

2 Tablespoons olive oil
1-inch piece ginger, peeled and sliced in 1/8-inch pieces
1/2 teaspoon turmeric
2 pounds leeks,washed, sliced in 1/2-inch rings and pieces
6 whole skinless boneless chicken breast, sliced in medallions
salt to taste
white pepper, to taste
 white pepper to taste 

2 cups chicken broth (more as needed)
1 bay leaf

Heat a large pot or dutch oven over medium-high heat. Add olive oil and heat until shimmery. Add ginger and turmeric and heat 1 minute, stirring occasionally.  Add leaks and saute for 5-8 minutes, until almost translucent.

Add chicken, salt and pepper, stir to combine. Cook 5 minutes stirring occasionally.  Pour chicken broth over all, not quite to the top of the food in the pot,  and add bay leaf. Cover. Bring to a simmer and reduce heat to medium-low. Simmer for 20-30 minutes until chicken is no longer pink in the center.

Serves: 6-8


Tuesday, September 10, 2013

A sweet and happy...

BS"D


At this time of year, Rosh Hashanah, the New Year in the Jewish Calendar, we wish people a sweet, happy and above all a healthy new year.  For those with IBS, Crohn's, Celiac and other stomach ailments, there is a daily challenge to all of these.

The specific-carbohydrate diet (SCD), designed by Elaine Gottschall,  over 30 years ago, has brought relief, health and happiness to many.


A former sufferer,  Rochel Weiss,  has embraced the SCD lifestyle to the extent that she developed a business around it (www.digestivewellness.com), and now a cookbook, A Taste of Wellness, in the hopes of helping others find relief in a tasty manner!

The book is expansive and literally includes everything from soup to nuts. Recipes range from everyday items like Cashew Bread, Spaghetti Squash Mac n' Cheese, to "company" food such as Vegetable Blintzes with Mushroom Sauce and Mock Potato Puffs (squash is used). Many of the recipes utilize nut flour and nut butter. Different from other gluten free diets, the SCD eschews "white" gluten free flours such as rice, potato and tapioca.  Various squashes are utilized to fill in for potatoes and other starchy side dishes.  Certain cheeses are allowed, and Ms. Weiss includes tempting dairy and vegetable souffles and quiches. Although the recipes are gluten free, they do rely heavily on other common allergens such as nuts and eggs.  However, this book is geared for those suffering intestinal ailments who could benefit from the Specific Carbohydrate Diet, and not intended as an allergen free cookbook.


The attractive and extensive photographs of the dishes enhance the books greatly, and further the author's assertion that these recipes are not only for the SCD follower, but will be loved by the whole family. 

The book also aims to provide concrete guidance for adherents of the SCD in areas such as travel and entertaining, which can be challenging at best for anyone following a special diet.  The author also includes a list permissible ingredients for the SCD and helpful menu plans. Overall, the tone of the book is encouraging and supportive.

During busy holiday season, Ms. Weiss suggests making ahead and freezing so you do not feel rushed and unprepared.  Unfortunately, many people go off special diets when stressed and harried, and given the option of other "tempting" traditional holiday dishes.  With the recipes in A Taste of Wellness, such as traditional Hungarian Stuffed Cabbage, Cheese Latkes and Kugel, you can prepare SCD based food for your entire family and I bet they won't even notice it's not made with wheat flour and other verboten ingredients!

L'shanah Tovah u'Metukah....May you be blessed with a sweet and happy new year...and most importantly healthy!


This recipe is festive and appropriate for the Jewish New Year, as it combines apples and honey---both traditionally eaten during Rosh Hashana celebrations.
 
Apple Kugel
from A Taste of Wellness by Rochel Weiss, p. 223

4 lbs. (about 12) apples, peeled cored and halved
ground cinnamon for sprinkling
6 large eggs
pinch salt
1 1/2 cups honey
1 cup oil  
2 tsp. pure vanilla extract
1/2 tsp. baking soda
4 cups almond flour
1/2 cup ground walnuts (or walnut flour)
plus an extra 1/4 cup for sprinkling

Preheat oven to 325F degrees. Grease a  10x16x2 inch baking pan.

Cut apples into 1/4-inch thick slices and spread evenly in prepared pan. Sprinkle apples with cinnamon.

Beat eggs with salt in a stand mixer on high speed until light and fluffy.

Gradually add honey and continue beating on high speed for another 3 minutes until light.

Add oil and vanilla extract and mix until well blended.

Gently fold in baking soda, almond flour and 1/2 cup ground walnuts.  Mix to combine.

Pour batter evenly over apples. Sprinkle remaining 1/4 cup walnut son top. 

Bake uncovered for 1 1 /2 hours. When done, top of kugel will spring back when lightly touched with fingertips.

Serve hot or cold

Yield: 16 servings

Note: This is not meant to recommend any particular diet for specific medical conditions. Consult with your doctor regarding appropriate diets for any medical condition.


Thursday, August 15, 2013

Better without Butter?

BS"D

Trying to think of catchy title for this post, and that's the best I can do. Today I had to answer the question, "is my child better off, perhaps, with her food restrictions?" The answer I grudgingly came up with was yes.

Although I generally love all things Trader Joe's, I decided their low-fat mayo is yucky. Purchased on one of those days when I didn't have a chance to go the chain supermarket for my perpetual favorite, Hellman's Low-Fat Mayo. The TJ's mayo has the look of homemade mayo, an off yellow as opposed to the more sanitized white of Hellman's, but it didn't taste homemade-- I don't know what it tasted like but just not pleasing to me. It's a pet peeve of mine to have two jars or containers of the same thing open in the fridge at the same time (i.e. two mayos, two containers of the same type of milk, two ketchups), usually a result of certain male members of the household not having the ability to see beyond the first two inches of the refrigerator shelves. But I reluctantly went to the pantry and placed my beloved Hellman's side by side w. the TJ's mayo in the fridge---I just couldn't make it 'till the end of that 32 ounce jar.  Sorry Joe. 

Then today I was staring into the fridge and I read that words I had previously missed,  that shifted my world a bit, "egg free" on the Trader Joe's jar. It was almost like a shining light glowed behind the blue and yellow jar, and I could hear harps playing in the distance. I quickly rotated the jar and scanned the ingredients for that allergen of Rosie's present in every other brand of vegan mayo I've encountered--mustard. Nope, turmeric yep, but mustard nope. I quickly went over to Rosie excited and said, You can have tuna salad for lunch now, isn't that exciting? I was met with a skeptical stony look, "Maybe", she answered, "but  not tomorrow." As thoughts of more things I've removed from our family repertoire flooded my brain, I blurted out "pasta salad with mayo, potato salad, coleslaw, sweetie, coleslaw!"  Items I've been making with olive-oil vinaigrettes for over 5 years. "Harumph, no!" She answered. That being the answer  I would expect from a crotchety old man when asked to try something new. I thought she would be excited that her world could expand, I thought she would somehow know how delicious mayonnaise laced salads are--iconic American dishes I thought everyone loved and craved! But no. She didn't know from them and they didn't appeal to her in any way.

Then I thought, will she be better or worse off with mayonnaise in her life. I would be subbing heart healthy olive oil for not so healthy fat in our dishes.  Plus it had sugar and cornstarch and a bunch of other fillers. I realized more is not always better. I've heard from other allergy moms that when their child outgrows a milk allergy, for example, they don't necessarily like the taste of cows milk they want their soy milk back. Now I see that even if they can have something previously off limits, they don't necessarily have to. If she ever outgrows her egg allergy, she may be repulsed by scrambled eggs, say no to them sunny side up, poached and boiled. And really that's fine.  She may continue to be the Tofutti corporation's best customer long after she's outgrown her milk allergy---if she ever does. I always felt she was missing out somehow, but that is not how she sees her life.  Not being able to eat any old type of junk food off the shelf has forced her to have more whole foods and brands with healthier, simpler ingredients. So, it has been a blessing in disguise I didn't notice until today.

One of Rosie's favorite dishes is mashed potatoes--without any dairy of cours. One day, a few weeks ago, I made smashed potatoes, as I was feeling lazy, and she loved them too.

The amounts vary based on the quantity you desire to make, so I am just giving the ingredients and they need to be eyeballed. Usually I am very precise with recipes, but as I mentioned, this was a lazy recipe, and I hope you forgive me.

Blissful Smashed Potatoes

Red bliss potatoes, skin on, quartered (scrub with a vegetable brush and water before peeling)
Extra virgin olive oil
Chopped dill (fresh or dried)
Fresh ground pepper
sea salt

Boil potatoes in a large pot of water until very tender, about 20 minutes. Drain and return to pot or a large bowl. With a fork or bottom of a whisk smash up the potatoes. They will not be creamy like mashed potatoes.  Drizzle olive oil over the potatoes and sprinkle with dill, pepper and salt to taste. Stir well and serve warm.

Wednesday, June 26, 2013

Campy Comfort

BS"D

Camp is underway and all the challenges we face at the beginning of the school year in terms of educating teachers and staff about our children's food allergies and sensitivities must be gone through once again. Keeping our children safe and happy I believe is any parents ultimate goal. When choosing a camp for a child with special dietary needs this can often present a challenge.

While many school districts have rules governing how a child with food allergies is dealt with in the classroom and lunchroom, camps are independent and make their own rules. Finding an appropriate camp is a process you should start in the winter. First identify parents who have dealt with similar issues and ask for referrals. Then, speak to the camp administrators. If they seem vague about food allergies or dismissive, move on. If you hear they have had campers with similar issues, and can explain in a satisfactory manner how they handled the challenges that arose, you have a keeper.


Inclusiveness is second to safety. We don't want our children to feel left out of fun activities.On my children's first day of day camp Daisie climbed into the car with a plate of decorated cookies and Rosie came in with a face made out of chocolate, sprinkles and licorice. Their baking teacher and Rosie's counselor had adapted the days activity for her in a way that was manageable for them and edible for her! I strongly recommend a necklace or bracelet with your child's food allergies/sensitivities, and your phone number for any questions. Some great companies I have found are, Lauren's Hope, Oliver's Labels and Allerbling. One year Rosie's counselor told me she frequently checked her necklace to see the list of allergens and appreciated it was there.
 

Sleep away camp for children with Celiac diseas or food allergies presents an entirely different level of challenges.  There are sleep aways in several states that are specifically for celiac/gluten sensitive children (such as the ones started by the Celiac Sprue Association).  As for food allergies, it can be more difficult if your child has respiratory reactions, and you have to count on the staff to administer emergency medicine in case of a reaction. You must thoroughly vet the administration and head cook to see if they have dealt with special dietary needs. I would never send a child to sleep away camp unless I was 100% confident the camp could handle my child's needs. Unfortunately, for some children sleep away may not be an appropriate option if such a camp can not be found.

Whatever your choices, make sure the staff is informed and can accommodate your child. Ensure your child has appropriate food on a daily basis, for day camp, and send shelf stable snacks for your sleep away child. It may also be the case that you have to send prepackaged meals and baked goods. I suggest a vacuum sealer for this purposes. It keeps food fresh and you can reheat in a microwave (slit open bag) or boil sealed in a pot of water.  There are several varieties of gluten free power bars on the market (check if your camp is nut free before sending), such as Kind or Gluten Free Luna Protein Bars...a Lillie favorite (make sure the variety you buy is OK for your child's diet).


A home baked treat is always the best. If you are sending to sleep away, find out if you can send a supply of baked goods to be placed int he camp freezer. Wrap well in foil and zip top plastic bags.

I wish you a safe and happy summer!


Chloe Coscarelli came out with a second vegan cookbook this year called Chloe's Vegan Desserts.  It has a most excellent selection of cakes, cookies, bars, pies and ice cream free of dairy, eggs and all other animal ingredients. Although the recipes call for wheat flour, I have successfully substituted all purpose gluten free flour blend with xanthan gum*.


These Blondies are the perfect treat in your campers lunchbox or to send in a sleep away care package.  Skip the nuts if your child's camp is nut free.

Blondies
from Chloe's Vegan Desserts by Chloe Coscarelli, p. 51

1 cup all-purpose gluten free flour blend with xanthan gum*
3/4 teaspoon baking powder
1/2 teaspoon ground cinnamon
1/4 teaspoon salt
6 Tablespoons vegan margarine (such as Earth Balance)
3/4 cup brown sugar
1 Tablespoon pure vanilla extract
1 Tablespoon dark rum or bourbon (optional)
1/3 cup semisweet chocolate chips (dairy-free)
1/3 cup chopped walnuts

Pre-heat the oven to 350F degrees. Lightly grease an 8-inch square pan and line with parchment paper long enough to overhang the edges.

In a medium bowl, whisk flour, baking powder, cinnamon, and salt until combined. Set aside. Using a stand or hand mixer, beat the margarine, brown sugar, vanilla, and rum, if using, until combined. Slowly beat in the flour mixture. Once the flour mixture is incorporated, add the chocolate chips and walnuts. The batter will be thick.

Evenly pat the batter into the prepared pan. Bake for 25 minutes, until lightly browned around the edges. Once cooled, lift the parchment paper to release the blondies from the pan and unmold. Using a sharp knife, cut into 2-inch squares and serve.

Yield: 16 bars


Monday, May 20, 2013

Salad Days

BS"D


We just finished the last of the Jewish year's major holidays, Shavuot, or as I like to call it "The Cheesecake Holiday". It's customary to eat dairy dishes, which are usually very rich and caloric. Now we face down a long, hot summer, and like many it's time to start a pre-bathing suit season diet. For many diet can mean deprivation, but instead replacing highly caloric meals with vegetable based ones is a good option. They can be colorful and interesting.


A salad with the addition of protein and a bit of texture, like croutons, is a nice contrast to having protein be the star of the meal. The other day at Trader Joe's, I spotted pea shoot sprouts, they seemed like an interesting new addition to a salad. My family uses Trader Joe's polenta a lot as it's gluten free and a very quick starch to prepare. It comes in a tube and I usually slice it and put it on a baking sheet with olive oil and herbs. It is also good for oven fries and a tomato-basil appetizer I love.

I decided to apply my oven-fried polenta technique to croutons. They are a nice and easy gluten-free alternative to bread croutons. If you want ot be extra decadent you can add grated Parmesan cheese to the recipe below---especially nice for a Caesar salad (but arent' we dieting?!).

Most of the ingredients for this recipe are in the spirit of Rachel Ray, "eyeballed".  If you aren't good at that just think of giving everything a light coating with the spices as opposed to a "breaded" look. I use olive oil in my Misto sprayer for this, but you can also use store bought non-stick cooking spray, or drizzle oil over croutons.

Polenta Croutons

1 tube, plain store bought polenta*
Olive oil
garlic powder
Italian seasoning blend (or separately dried basil, oregano, sage)
sea salt
fresh ground black pepper

Preheat an oven to 450° and spray a large, non-stick baking pan with olive oil or non-stick baking spray. 

Cut the polenta into approximately half-inch  cubes and place in a baking sheet (you can also toss them with seasonings in a bowl), drizzle or spray with olive oil, sprinkle lightly with spices and toss to evenly coat. Spread polenta cubes into a single layer.

Bake in pre-heated oven for 30-40 minutes, turning once, until golden brown. These are crunchy on the outside and tender inside!


*If you prefer to use homemade polenta, spread warm polenta in a greased sheet pan; allow to harden and cut in cubes. Proceed as above.


Note: Not all of the recipes below in the Kosher Link-Up are gluten or allergen free.


Monday, March 18, 2013

Passover is Pashut

BS"D

Pashut means simple in Hebrew. Passover evokes a time of difficulty for those preparing the meals, different utensils, different food products, but it doesn't have to be so complicated--it can be made more pashut. The massive variety of packaged and frozen Passover products in stores nowadays truly has made my life simpler at this time of year.

A classic feature in our Passover preparations are Manischewitz products. I recall the ubiquitous orange and green boxed products coming into our home every year at this time.  The new gluten free products Manischewitz has for Passover this year are nothing like my Mama's macaroons.  They have gluten free cake mixes, red velvet macaroons, gluten free matzo style squares (not actually ok for hamotzi--only oat matzo is), almond butter and Magic Max gluten free cereal, to name a few. Passover certainly is the best time of year to be gluten free. So stock up on some nifty new treats and enjoy the holiday.


Note: Make sure all ingredients used in the recipes below are both gluten free and specifically marked kosher for Passover.

Ohio Buckeyes
 Photo credit: Domino's Sugar website

When I discovered kosher for Passover almond butter, I immediately thought about making a favorite recipe that normally uses peanut butter, buckeyes, with almond butter. Buckeye's are a specialty of Ohio, the "Buckeye" state, and resemble the seeds of the eponymous tree. 

Almond-Butter Buckeyes

1/2 cup butter or margarine, softened
2 cups almond butter
1 lb. (3 3/4 cups) confectioners' sugar 
6 ounces semi-sweet chocolate chips, melted and cooled about 15 minutes

Beat together butter and almond butter until light and fluffy. Add confectioners' sugar gradually, beating until blended.(Mixture will be crumbly).

Shape into 1 1/4-inch balls. Insert toothpicks into balls and dip halfway into melted chocolate. Place on a cookie sheet lined with wax paper. Chill until firm.

Makes about 4 dozen balls.


After buying  the very popular and very expensive (about $7-$8 for an appetizer sized plate pizza) frozen Passover pizza one year , I decided to experiment with my own year round favorite recipe.Using tapioca and potato starch I came up with a crust very close to the store bought one, but much cheaper. You can make the crusts ahead and freeze untopped or top with sauce and unmelted cheese, then pop in the oven and cook as normal for a really convenient passover meal.


Passover Pizza Crust

adapted from Culinary Potions by Eve Berman, D.O., p. 61


1/4 cup 2% milk or almond milk
2 large eggs
2/3 cup tapioca flour
1/3 cup potato starch
1/4 cup olive oil


Pre-heat oven to 400F degrees

Whisk together the milk and egg.

Add the remaining ingredients and mix until smooth.

Grease a raised-edge pizza pan (12-inches), or 2x 8x8 or 9x9 square or round pans with oil or non-stick cooking spray and pour in the batter

Bake for 8 to 10 minutes, then remove from the oven. The crust is done when it lifts easily from the pan with a spatula. The crust will raise up the sides of the pan as it bakes. If the crust is too wet,  cook for a few more minutes. Add desired toppings, and return to the oven (for about 10-15 minutes) until cheese melts, and toppings are cooked through.

Yield: 8 slices


Here is Colette Martin's "formula" for making store bought cake mix without eggs or dairy.  I have been successful trying it with year round gluten free mixes, but have not yet tried it with passover mixes...but I have high hopes!

Store-Bought Cake Mix without eggs or dairy products
Adapted From "Learning to Bake Allergen-Free" by Colette Martin, p. 241

In the mix substitute:

  • An equal amount of melted margarine for butter.
  • For every 2 eggs, 1/2 cup unsweetened applesauce (I've found baby food works well too...pear, apple or squash flavors), and 1 tsp. baking powder.
  • For buttermilk, milk or yogurt, equal amount kosher for Passover almond milk, coconut milk, or water.
  • Vanilla extract, same amount or 1 Tbsp. vanilla sugar for every 1/4 tsp. vanilla extract.
  •  Bake according to package directions, but it may be moister in the middle and require additional baking time; check every 5 minutes of additional baking time.


Note not all recipes in the kosher link-up below are gluten free:

Monday, February 11, 2013

Have your cake and eat it too....

BS"D

Today Rosie had a play and celebration for her class at school. I marched into the reception with a Tupperware of delicious chocolate cupcakes creatively decorated for the theme of the day.  One of the other mother's who is gluten sensitive saw them and said, "Oh are those gluten free...I bet they're better than the regular cake!" Competing with the huge, attractively frosted sheet cake is a tall order. But, I've learned one on a special diet CAN have their cake and eat it too. BTW thank you to that mom for making me feel great!

Chloe Coscarelli proved you can make a vegan cake and trounce the competition.  By winning Cupcake Wars, a show that pits 4 cupcake baker against each other each episode for a chance to cater a big name even, she proved someone on a special diet can have their cake and eat it too. Check out her blog for more information.

Coscarelli's first book (second one coming soon), Chloe's Kitchen: 125 Easy, Delicious Recipes for Making the Food You Love the Vegan Way,  provides delicious options for everything from appetizers to desserts, simple family dinners to elegant entertaining.  The attractive photos highlight the freshness and variety one can garner from food that is free of meat, dairy and eggs. The fact that the very picky judges of Cupcakes Wars put her at the top of the heap is proof of this. Her book includes sections like Small Bites, for party fare (or just to treat yourself) including Avocado-Shitake Sushi and Black Bean Baby Cakes with Pineapple Salsa. Her whimsical entrees include items like, Orange You Glad I Made Crispy Tofu, with a stir fry sauce utilizing the healthy sweetener, agave nectar, instead of often sugar laden bottled orange sauce.  Chloe's desserts shine through (her upcoming second book is ALL desserts), with selections like dairy and egg free Chocolate Creme Brulee---a seemingly impossible feat.  So with Chloe's help you TOO can have your cake and eat it too on special diets.


Purim is a major junk food holiday. We exchange gift baskets which are meant to be food used for the large celebratory meal, or Purim Seudah, celebrating the miracle that happened to the Jewish people in the time of Queen Esther.  But,it has devolved, more often than not, into a junk food free for all. Children can be found eyes glazed over clutching sacks of candy and chips, sitting in a corner eating mindlessly.  I like to put care into my gifts of food and choose items my family would actually eat.  One can emphasize healthier options and give away healthier sweets and treats.

This bar cookie strikes me very much as the type of dessert I would make to give to someone as a gift. I have subbed all-purpose gluten free flour blend (I like Jules Gluten Free) for the all purpose flour in the recipe as it is written.

Sea Salt Toffee Bars
Chloe's Kitchen by Chloe Coscarelli
p.p. 233-4

Shortbread Crust:
1 cup all-purpose gluten free flour blend with xanthan gum
1/2 cup chilled vegan margarine (such as Earth Balance buttery sticks)
1/3 cup powdered sugar
1/2 tsp. ground cinnamon

Caramel:
1 cup packed brown sugar
1/4 cup vegan margarine
4 tsp. soy, almond or rice milk

Glaze:
1 cup semisweet non-dairy chocolate chips
Fleur de Sel (coarse sea salt) for sprinkling

To make  crust:
Pre-heat oven to 350F degrees. Line an 8-inch square pan with foil or parchment paper long enough to overhang edges.

In a food processor, pulse flour, margarine, powdered sugar, and cinnamon until crumbly. Press into prepared pan and bake for 18-20 minutes, or until edges are golden. Remove from oven, let cool, and then chill in refrigerator.

To make Caramel: In a small saucepan, over medium heat, heat brown sugar, margarine, and non-dairy milk, stirring frequently. Once mixture comes together, increase heat to medium high for 1 to 2 minutes, until it begins to boil and the bubbles move into the center of the caramel. Remove form heat and let sit for 10 minutes.

To assemble the bars:  Pour the Caramel over the chilled Shortbread Crust. let cool, and return the pan to the refrigerator to chill.

Melt the chocolate chips over a double or int he microwave (high for 2 minutes, stir until smooth). Evenly spread the melted chocolate over the caramel layer. Sprinkle with fleur de sel and return to the refrigerator. Once the chocolate has solidified, lift the cookie from the pan with the foil and remove the foil. With a sharp knife, cut the cookie into 2-inch squares. 


 This Ketchup recipe is ALOT healthier than the bottled variety. Package it in a small mason jar with a festive ribbon or label.  The less processed variety of agave nectar (darker) is considered the best.


Sweet Tomato Ketchup
Chloe's Kitchen by Chloe Coscarelli
p. 253

1 cup tomato puree
1/4 cup blue agave nectar
1 clove garlic, pressed
2 Tablespoons plus 2 teaspoons white or apple cider vinegar
1 teaspoon sea salt
1/4 teaspoon ground cinnamon
1/2 teaspoon onion powder
1/8 teaspoon cayenne pepper, optional

In a medium sauce pot, combine tomato puree, agave, garlic, 2 Tablespoons vinegar, salt, cinnamon, onion powder, and cayenne, and bring to a boil. Simmer on low for 30 minutes, or until the mixture thickens. Whisk in remaining 2 teaspoons vinegar. Let cool and chill in the refrigerator.