Tuesday, August 23, 2011

Pop on In


BS"D

Keeping cool in the summer is not just about air-conditioning and swimming pools. It is as much about sitting back in the lawn chair with a cherry popsicle dripping down your hand faster than you can eat it, and frosty drinks in tall glasses sipped slowly through straws. For my kids it's about running through the sprinkler with the promise of a freeze-pop afterward. For me it's about getting a tall iced coffee after I drop my kids off at camp.


Besides being a classic summer treat, popsicles are the new "in" dessert, according to some. As the popsicle usurps cupcakes and macarons, an all-popsicle restaurant opened up in Manhattan called Popbar. And (dramatic pause), it is even gluten-free and kosher, according to their website!


There is even a machine called the Zoku Quick Pop Maker, which can freeze popsicles in about 10 minutes. My preferred method is using the plastic molds from the dollar store. I'm ok with planning ahead for my popsicles, and waiting the few hours for them to freeze. As for what flavors to make, today popsicles have been "upgraded" and recipes often include fresh herbs and exotic juice combinations. A book called Paletas by Fany Gerson, gives recipes for pops ranging from the exotic, like mango-chile to the more traditional berry-yogurt. She also includes recipes for aquas frescas, or refreshing drinks in Spanish. Speaking of which, I recently discovered a cold Mexican milk-based beverage called the Horchata. This ain't yo' mama's milkshake. The Horchata is rice-thickened milk seasoned with spices and sugar. I took from my garden's bounty and paired the Horchata with basil for a surprisingly interesting flavor treat.

Whether you like your summer refreshement in solid or liquid form, enjoy the following recipes in the waning days of the season!


Instead of the tradiitonal way of making the horchata with ground rice, I used rice flour, something gluten-free bakers always have on hand!


Basil-Lemon Horchata


1 cup whole milk

2 cups water

1/4 cup loosely packed fresh basil (if you have lemon-basil even better)

zest of 1/2 lemon

1/4 cup granulated sugar

2 Tablespoons sweet rice flour

lemon peel curl for garnish, if desired


Heat the milk in a small saucepan over medium simmer for 10 minutes. Add the water, basil and lemon zest. Continue cooking for an additional 10 minutes.


In a medium sized lidded-contianer, whisk together the sugar and rice flour. Place a small strainer over the container, slowly pour the hot milk mixture through the strainer. Stir to combine. Allow to cool for 10-20 minutes, cover and refrigerate until chilled, 2 hours to overnight.


To serve: Fill a glass with ice. Pour horchata over ice. Garnish with lemon curl, if desired. Serve immediately.


Yield: 2-3 servings


If you don't have pop molds, you can place aluminum foil tightly over a plastic cup filled 3/4 full with popsicle mixture, and pierce center with wooden popsicle sticks, also known as craft sticks. Freeze as directed.


Strawberry-Watermelon Popsicles

from Sweet & Skinny by Marisa Churchill, p. 124


2 cups strawberries, hulled

2 cups cubed watermelon

1/3 cup plus 1 Tablespoon agave nectar


Blend the strawberries, watermelon, and agave nectar in a blender or food processor until the mixture is completely smooth.


Pour the mixture into eight popsicle molds, snap on the tops, and freeze until the popsicles are frozen sold, about 6 hours.


Unmold and serve. If the popsicle will not release from mold, briefly submerge mold in warm water.


Yield: 8 popsicles


Lassis (not Timmy's pet) are cooling yogurt drinks that are popular in India.


Mango Lassi


1-8-ounce container plain or vanilla flavored yogurt

1 ripe mango, cubed

honey to taste

milk or water to thin

ice cubes, as desired


Place all ingredients in blender and process until smooth. Serve chilled.


Yield: 2 servings


Tuesday, August 16, 2011

Artisanally Appealing


BS"D

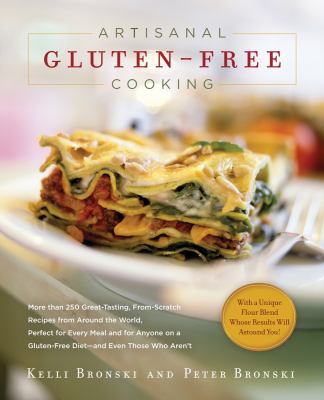
I had seen the picture of the luscious veggie packed lasagna on the cover of Artisanal Gluten-Free Cooking by Kelli Bronski and Peter Bronski staring back at me on Amazon.com for some time. Whenever I searched gluten free cookbooks, there it was. But I had passed on it for awhile as I am a busy mommy and I assumed artisanal food would be time consuming, and require me to use organic heirloom tomatoes harvested from my own garden, or at the very least from the farmer's market.


But, when their publisher, The Experiment Publishing, very generously sent me their second book to review and GIVEAWAY (see below), Artisanal Gluten-Free Cupcakes, I decided I should take a look at the first book as well. I was extremely pleasantly surprised to see that Kelli and Peter Bronski have got a grip. They understand the busy mommy thing, and although they value greatly the freshest organic ingredients, they know everyone does not have the wherewithal to stock their kitchen with sustainable, free trade ingredients from Whole Foods. Nor, can everyone make their own pasta at 5:30 for dinner at 6:00 with a two year old wrapped around ones leg. There were no requests for kefir lime leaves or date palm sugar. Just things I happened to have in my pantry (o.k. I happen to have coconut milk and a 4 types of paprika in my pantry, but still). And, best of all, I don't feel compelled to make my own chicken broth from free range chickens and vegetables grown within 10 miles from my house, the type that comes in the box is o.k. too.

Although the Bronskis don't seem to actually define the word "artisanal" (pertaining to or noting high-quality, distinctive products made in small quantities according to dictionary.com), their attitude seems to be take care in sourcing and preparing your food to the best of your ability and means. They even go as far to offer tips for shortcuts and pre-made ingredients (such as a bag of coleslaw instead of cabbage and carrots in one recipe I tried). This I appreciate greatly, as I feel they are offering the best of the two worlds I live in and try to bridge-- gourmet food and busy mommydom. I also greatly appreciated their professionalism, which comes through in the book. Peter Bronski is a travel writer with several books to his credit, and Kelli Bronski has a degree from the prestigious hotel and restaurant school at Cornell University. So, not only do the recipes work well, they are well written. I did notice one imperfection though, the Creme Brulee recipe was missing an oven temperature for baking! Yikes! But after making Creme Brulee for the first time ever with the Bronskis very simple instructions (and Joy of Cooking oven temp.--325F), I actually got why this seemingly simple custard it is such a big deal in the dessert world.


Artisanal Gluten-Free Cooking encompasses contemporary flavors such as Thai and Caribbean food, as well as homey old favorites like German Potato Salad and Apple Pie with Streusel Topping. I think this is a very good all around cookbook, which offers sophisticated recipes for entertaining such as Dessert Crepes with a Trio of Sauces, as well as Chicken Noodle Soup, for a cozy family supper. As I mentioned above, the recipes are very clear and well written with introductions that draw you into the Bronski kitchen as if you were family.


I tried two dishes which were instant favorites with my family, Caribbean Rice and Costa Rican Slaw. Both had fresh, bright flavors and were easy to throw together in a short amount of time. Lillie's comment on the rice says it all, "Mmmmm. Good. Very Good."


Look for a review of Artisanal Gluten-Free Cupcakes in an upcoming blog. In the meantime try for an exciting, free giveaway. Just leave a comment about this post with your e-mail address in the comments section below, and you will be entered to win a copy of the Bronskis' newly released and fabulous book, Artisanal Gluten-Free Cupcakes (provided by the publisher who did not influence this review in any way). The winner will be randomly chosen from all eligible blog entries. The contest will remain open until 11:59 p.m. on September 15th, 2011.


Although this recipe calls for adding the mango to the dish while it is cooking, we liked it better served on top of the cooked rice as a garnish.


Caribbean Rice

Artisanal Gluten-Free Cooking, p. 87


1 Tablespoon olive oil

1/2 medium onion, diced

1 garlic clove, minced

1 cup long-grain rice

1 cup Gluten Free chicken broth or vegetable broth

1 cup coconut milk

1 teaspoon dried thyme

1/2 teaspoon ground turmeric

1/2 teaspoon salt

1/4 teaspoon pepper

1/2 cup canned kidney beans, rinsed and drained

1 ripe mango, peeled, pitted, and cut into 1/2-inch cubes


1. Heat the olive oil in a large saucepan over high heat. Add the onion and garlic and saute until translucent.


2. Add the rice, broth, and coconut milk. Stir in the thyme, turmeric, salt, and pepper. Bring to a boil and reduce the heat to low. Cover and simmer for 15 minutes, or until the rice is tender and the liquid is absorbed.


3. Add the beans and mango and cook for an additional 5 minutes, or until heated through.


Yield: 4 servings


I took the quick shortcut the Bronskis suggest for this recipe, using bagged cole slaw mix instead of the cabbages and carrots called for in the ingredient list. I also took it upon myself to sub canned sliced beets, which I julienned, instead of the raw beet. The texture wasn't as crisp as a raw beet, but it was quick!


Costa Rican Slaw

Artisanal Gluten-Free Cooking, p. 100


1/2 head green cabbage, thinly sliced and chopped

1/2 head red cabbage, thinly sliced and chopped

1 medium carrot, peeled and grated

1 raw beet, peeled and grated

3 Tablespoons chopped fresh cilantro

1/4 cup olive oil

2 Tablespoons apple cider vinegar

1 to 2 teaspoons honey

Salt and pepper


1. Combine the green and red cabbage, the carrot, beet, and cilantro in a large bowl.


2. Whisk together the olive oil, vinegar, honey, and salt and pepper in a small bowl. Drizzle the dressing over the salad, toss and serve.


Yield: 10 servings


Monday, July 25, 2011

Biscuits are a snap!


BS"D


I walked into the kitchen this afternoon after putting Posie down for a nap and I noticed Lillie mixing up chocolate milk for Daisie and herself. How nice I thought of her to help her sister. Then I glanced at the quart of milk and the size registered first, wait that's not the gallon we usually use, then my synapses started firing as I grabbed the carton before Lillie poured a glass for herself. "That's buttermilk!" I said. "Oh, I guess that's why Daisie didn't like it." Lillie said. I just laughed to myself at this kitchen mix-up. We've all had them. Anyway, the buttermilk was left over from some amazing biscuits I made last week which I adapted from my new favorite cooking website, Taste and Tell. The blogger tries recipes, almost daily, from different blogs and cookbooks and reports on them. The pictures are as mouth watering as the recipes.


I actually started on a biscuit kick recently when I saw Southern Biscuits by Nathalie Dupree and Cynthia Graubart at my local library. For those of you who don't know her, Nathalie Dupree was doing the Paula Deene thing before Food Network eclipsed PBS's bright stars in the cooking show galaxy. Dupree specializes in low-country Southern Cooking, such as that from Savannah, where Paula Deene lives. So I snapped the book off the shelf and a few shakes of flour later I felt like an expert biscuit maker.


Much to my chagrin, in over 200 pages of biscuit recipes and instructions, the authors did not include one gluten free recipe. However, biscuits inherently lend themselves to gluten free baking for the following reasons:


1) Biscuits are best made with low gluten flour, such as the Southern all-purpose brands which have less gluten than national brands. That is because you don't want to create elasticity as you would with a yeast bread.


2) Gluten free bread recipes yield a "quick bread" type batter, even the yeasted ones, as opposed to an elastic dough for yeast breads. Biscuit doughs are similar in texture to gluten free bread.


3) Biscuits should not be overworked as you want to hinder the gluten production for a flaky crumb (see #1 above). You can never overwork gluten free flour. It will never get tough.

I wanted to see if I could replicate Southern-style biscuits using gluten free flour. In the past some of the gluten free bread recipes I've made have come out like biscuits, so I felt optimistic. One has the option of making a rolled biscuit, which is cut with a biscuit cutter (actually patted into place not really rolled with a rolling pin), or drop biscuit. Being a long term Bisquick fan, I prefer the drop method. Employing a very American attitude, I feel if you can prepare a biscuit in 10 minutes, why wait 20.

Despite not actually having any gluten free recipes in Southern Biscuits, Dupree and Graubart's book did come in handy as far as learning the biscuit making technique-- which I was then able to apply to gluten free biscuits. The book has very helpful pictures that instruct you how to "snap" the fat into the flour. Basically you add pieces of softened butter, shortening or margarine to the flour, dig your hands in and glide your pointer and middle fingers across your thumbs--a snapping motion. By working the fat into the flour this way, you create little pockets of fat which will melt upon baking, creating flaky layers. Then the liquid is added to the center of the flour mixture and you sweep the flour into the liquid with your hands or a spoon. The result is a light, delicious and authentic tasting Southern biscuit. Bon Appetit y'all!


Butter really does make everything better!


Although the distinctive tang of buttermilk gives this recipe an authentic flavor, you can easily make this recipe non-dairy by substituting acidulated soy or rice milk (see below) and margarine instead of butter.


Southern Style Buttermilk Biscuits
Adapted from Daddy’s Rise and Shine Biscuits from Southern Plate via Taste and Tell blog


2 1/4 cups all-purpose gluten free flour blend with xanthan gum (I used Jules brand)
1 Tablespoon baking powder
1 1/4 teaspoons salt
1/2 cup butter or non-hydrogenated margarine (such as Earth Balance Buttery Sticks), softened, cut into cubes
1 1/4 cups buttermilk or acidulated milk*
1 beaten egg white, optional


*To make acidulated milk: For every 1 cup of milk (cow's, soy or rice), stir in 1 tablespoon of white vinegar and allow to sit for 10 minutes.

Pre-heat the oven to 450F. Spray a cookie sheet with non-stick cooking spray.


Sift together the flour, baking powder and salt into a large mixing bowl. Add in the butter or margarine, and using a pastry cutter, or your hands with the "snap" method as described above, cut the fat into the flour mixture. Cover and place in the refrigerator for 10 minutes.


Remove bowl from the refrigerator. Make a well in the center of the flour mixture and add in the buttermilk slowly and stir just until combined.

Spoon the dough by about 1/4 cup scoops onto prepared cookie sheet, 2-inches apart. Brush with egg white, if desired. Bake in 450F degree oven for 15 to 20 minutes, until lightly browned.


Remove from the oven and turn upside down onto a plate to cool (I got this tip from Nathalie's book).


Yield: 8-10 large biscuits


Serving suggestion: Serve warm with butter and blackberry jam. Leftover biscuits can be kept in a plastic bag at room temperature for a day or two and re-heated before serving. Cold biscuits leave a lot to be desired!

Tuesday, July 12, 2011

You say potato I say polenta


BS"D


It was a hot and well, hot day. I wanted something easy for dinner and decided on hamburgers and sauteed onions. I never feel just a hamburger on the menu is enough, and filled out the menu with corn, pickles and tomatoes. But I still felt I needed a starchy side dish. I rifled through my freezer looking for the bag of fries I always keep there. O.k. I guess it's not always. I quickly remembered the tube of polenta I had picked up at Trader Joe's a few weeks ago. I'd been meaning to experiment with polenta fries and so it went.


I have a deep seated fear and general dislike of deep frying, as I feel it makes the whole house smell like a fast food joint, I only do it 2 or 3 times a year. So, I decided to oven fry the polenta "fries". I'm a big oven fryer. It involves putting the food in question, on a very non-stick surface, spritzing with PAM or brushing with oil and baking at a very high temperature, usually 400F degrees or higher. Since polenta is on the bland side, I also coated it with seasoning.

Well it worked great and Lillie even gave a "It's Yummy!" Something that's hard to come by with my pint sized critics. I was pleased with how it turned out and there were even calls for seconds. When you have the summer kitchen "blahs" and don't feel like doing much in the way of cooking, try this option. The polenta fries definitely mixed things up, got me out of the kitchen quickly and are quite a bit healthier than regular fries to boot!


Spices can be adjusted to your taste. Any spice blend can be used. About 1/2 teaspoon per tube of polenta works fine, although with herbs, you should use about 1 1/2 teaspoons. Try Italian, Cajun and Provence herb and spice mixtures.


Spicy Polenta Fries


1-18 ounce tube shelf stable or refrigerated polenta
2 Tablespoons olive oil
1/2 teaspoon Old Bay Seasoning

Pre-heat oven to 425F degrees.

Cut polenta in tube in half or thirds then, then into 3"x1/2" sticks, resembling french fries.

Place cut up polenta in a medium sized mixing bowl, and toss with olive oil and seasoning.

Spread in a single layer on a non-stick cookie sheet (or use Reynold's Non-Stick Aluminum Foil on any baking sheet). Bake for 15 minutes per side, for a total of 30 minutes, until golden brown and crispy. Serve hot.

Yield: 4 servings


Variations:


For spicy fries: add 1/4 teaspoon (or more to taste) cayenne pepper


For Rosemary and Garlic fries: Ass 2 teaspoons dried rosemary, crushed, and 1 clove crushed garlic or 1/2 teaspoon garlic powder


Saturday, June 18, 2011

Cakes-a-Poppin'

BS"D


***Scroll Down To Enter Free Book Giveaway***


Have you noticed desserts are getting smaller these days. Although the classic small dessert, the "Petit Four", has been in style for a few centuries, the cupcake has really taken off as the dessert of choice in the last half of the 20th century. The 21st century has gone even smaller with the cake pop sensation that is sweeping the nation. Angie Dudley, a blogger that goes by the name "Bakerella", has popularized these cute little cake balls on a stick. And, she bumped them up a notch, by designing pops that look like everything from owls to mini-cupcakes. Her book "Cake Pops" gives step by step instructions for pops for just about every occasion you can imagine.
The new trend may be a good thing health wise as you're able to get your dessert in a couple of bites of cake instead of a big piece. I like the idea of the cake pops not only because they are visually stunning, but because you can have a bite of fudge cake, a bite of red velvet and a bite of vanilla without investing in the calorie count of three slices!


But how do these cakes work out for the gluten free baker? I wasn't sure at first as gluten free cake tends to be crumbly, but the secret to the cake pops actually works out very well with gluten free cake. The process involves crumbling cake (with GF cake you are halfway there out of the oven), mixing in prepared frosting, which acts like a glue for the crumbs, then encasing them in candy coating. The pops can then be dipped in sprinkles, nuts, coconut, crushed cookies, or decorated according to the instructions in the book. I suggest watching Dudley's how-to video on Amazon.com.

My first attempt is pictured here. I dipped green pops in flower sprinkles and stuck them in Styrofoam inserted in a flower pot. The effect was springy and fun, and needless to say the kids loved them! I used Shufra brand gourmet baking bar for the candy coating as I needed a non-dairy alternative for the Candy Melts (Wilton brand), which seem to be the candy coating of choice in the book. They worked beautifully. Regular chocolate chips would work too, but they tend to be thicker than candy coating, and so you may need to add a teaspoon or two of solid vegetable shortening before melting to achieve a glossy coating and silkier consistency for dipping.


I wanted to use a boxed cake for added convenience in this project, but the eggs required in the boxed mix are a problem for Rosie. On the Internet I found a number of recipes using a can of soda and pudding as a substitute for the eggs and fat in boxed cake mixes. I tinkered around and came up with the recipe below. Link to Bakerella.com to use this cake or anyone of your choosing in a variety of eye catching cake balls and pops.


Enter to win a copy of "Cake Pops" (which was generously supplied by Chronicle Books). Leave a post below with your e-mail address (in case you win), and tell me what you like about cake pops. The contest ends July 31st, 2011 at 11:59 p.m. The winner will be randomly selected from all posts. Good luck!

Check back in August, as I will continue the theme of small desserts with a review and giveaway of the just released Artisanal Gluten-Free Cupcakes by Kelli and Peter Bronski.


You can make this recipe with any flavor soda or plain seltzer. The soda flavor should compliment your cake, like cherry with chocolate cake or lemon-lime with yellow cake, etc.


Instantly Vegan Cake


1-15 ounce box Gluten Free cake mix
1-1.7 ounce box instant pudding (any flavor), or 1/2 -3.4 ounce box instant pudding
1-12 ounce can soda (any flavor) or seltzer (additional as needed)
1 Tablespoon canola or vegetable oil

Pre-heat oven to 350F degrees. Spray an 8 or 9-inch round baking pan with non-stick cooking spray, and line with parchment paper cut to fit the bottom of the pan, or line a 12 cup muffin tin with paper liners. Set aside.

In a large mixing bowl combine all the ingredients. Beat on medium speed with an electric mixer for 2-3 minutes until well blended, or vigorously mix by hand with a wooden spoon until thoroughly blended and smooth. Additional seltzer or soda may be needed to achieve a cake batter consistency. Add a couple of tablespoons at a time until desired consistency is reached.


Pour batter into prepared pans. Bake according to package instructions, but check 10 minutes before the end of the suggested cooking time, as this cake generally needs less cooking time than that indicated on box.

Place on wire rack to cool completely. The top of the cake may crack as it cools. Store covered.

Yield: One 8 or 9-inch cake layer

Saturday, June 11, 2011

Snap, Crackle, Gluten Free!


BS"D

Well, it's official, Rice Krispies Gluten Free Cereal is here! I heard a rumor that the cereal was in the works, and I mentally ran through the ingredients, realizing that the only thing they really had to get rid of from the original was malt flavoring. Yet, I figured this was under tight wraps in a super secret food lab in Battle Creek, and would be made public perhaps in the next few years. So, what a great surprise when I went to amazon.com to see an ad for Rice Krispies Gluten Free Cereal. It sells for just under $4 a box. In our house gluten free crisp rice cereal has been a luxury in recent years. Ringing up at about $5 a box at the health food store, I reserved the precious puffs for our favorite confection Chunk-a-Chews and other specialty recipes. I would cringe when the kids would request it for breakfast, pour a big bowl and they would take 2 bites then abandon the cereal for playtime. The Kellogg's website has printable coupons for $1 off any Rice Krispies, so that certainly sways me to buy their brand over the brand I could only buy at the health food store.


It's just nice knowing that more and more brands are available on our supermarket shelves with "gluten free" emblazoned over already familiar logos. I literally did a double when I walked past the Tasteekake display recently and saw "Gluten Free Cookies". "No, can't be" I thought. Maybe I just need another cup of coffee. But when I backed up my cart and stared at the boxes among the squishy snack cakes we've known and loved for years, I saw it was true.

Even thought these items are a bit pricier than their glutenny counterparts, and I don't expect sales on them anytime soon, it's comforting to know they are there and we now have options.


Have you been missing that classic childhood treat Rice Krispie Squares? Well you can have it again made with the genuine article. I use eggless marshmallows to accommodate Rosie, they are also know as "vegan marshmallows". I like Lieber's brand and stock up at Passover time when I find them in abundance.

Gluten-Free Treats®
from Kellogs.com
Ingredients:

3 tablespoons butter or margarine*
1 package (10 oz., about 40) regular marshmallows*
- or - 4 cups miniature marshmallows*
6 cups Kellogg's® Rice Krispies® Gluten Free cereal

Directions
1. In large saucepan melt butter over low heat. Add marshmallows and stir until completely melted. Remove from heat.


2. Add KELLOGG’S RICE KRISPIES Gluten Free cereal. Stir until well coated.


3. Using buttered spatula or wax paper evenly press mixture into 13 x 9 x 2-inch pan coated with cooking spray. Cool. Cut into 2-inch squares.

Best if served the same day.


MICROWAVE DIRECTIONS: In microwave-safe bowl heat butter and marshmallows on HIGH for 3 minutes, stirring after 2 minutes. Stir until smooth. Follow steps 2 and 3 above. Microwave cooking times may vary.
Store no more than two days at room temperature in airtight container. To freeze, place in layers separated by wax paper in airtight container. Freeze for up to 6 weeks. Let stand at room temperature for 15 minutes before serving.


Sunday, May 8, 2011

Make and Take


BS"D

Mother's Day is today, and in my mind it kicks off a season of celebrations, fun in the sun and barbecues. Least of all we want to worry about are vomiting and crippling stomach pains the next day. In previous blog entries (click on this link), I've given some tips for successfully navigating celebrations. They all take planning and effort on your part, such as speaking with the host to verify what can be eaten and bringing a dish that everyone can share. But, to quote Robert Burn's, "the best laid plans of mice and men often go awry". Such as the hostess believing what she made is gluten free, or the delicious gluten free casserole you brought being "contaminated" by a serving spoon from the macaroni salad. You get the picture. In fact, I recently read a gluten free blogger's child was "gluttened" for the first time in 11 years at a party that was supposed to be entirely gluten free!


So, the only 100% safest route is to bring your own meal. You don't have to lose out on any of the fun of the party, nor do you have to lose out on taste. Bringing your own food doesn't have to be a bologna sandwich in a Hello Kitty lunchbox. I recently developed a loaf pan lasagna that makes 2 servings. And the best part is, it's lower in fat and calories than most lasagnas. You can certainly "plump it up" with full fat cheeses and more of them, but it's delicious as is too! It's easily transported in the loaf pan in which it's made (disposable may be used), freezes well, and can be heated up easily in a microwave (out of the metal pan) or an oven. You can even make a few of these at once, using up the entire box of lasagna noodles, and freeze so you are ready to go at a moments notice. You can even use some fresh herbs which are starting to come up at this time of year. This particular recipe struck me as perfect to take to a Mother's Day brunch.

For added convenience, the lasagna may be assembled up to 8 hours in advance. Pour in the water before baking. If you aren't counting calories, add 2 Tablespoons Parmesan cheese to the spinach mixture. For a vegan version of this dish, substitute soft tofu for the ricotta cheese, soy cheese for the mozzarella, and omit the egg.

Skinny and Single Vegetarian Lasagna

1-10 ounce box frozen chopped spinach, thawed
1 egg white
1/2 c. part-skim ricotta cheese
1 garlic clove, crushed
1/2 teaspoon dried basil (or 1 Tablespoon fresh, chopped)
1/4 teaspoon dried oregano (or 1/2 Tablespoon fresh, chopped)
salt and pepper to taste
3/4 cup marinara sauce
3 gluten free lasagna noodles (such as Tinkyada), uncooked
1/4 c. low fat mozzarella cheese*
1/4 cup water

Pre-heat the oven to 350F degrees.

Squeeze spinach between hands to remove as much liquid as possible. Place in medium sized mixing bowl. Add egg white, ricotta cheese and spices. Stir until well combined.

Spray a 1-lb. loaf pan (8.5x4.5inches) with non-stick cooking spray. Spread 2 Tbs. of marinara sauce on bottom of pan. Layer 1 noodle, 1/2 of spinach mixture and 1/3 of sauce. Repeat. Top with remaining noodle and sauce and sprinkle with mozzarella cheese.

Pour water around around edges of pan. Cover with aluminum foil and bake for 40 minutes. Remove foil and bake another 10 minutes until cheese is brown and bubbly. Allow to rest 10 minutes before serving.

Serves: 2 (or 1 person who has seconds)

*You may use more mozzarella cheese and sprinkle over each layer.