Monday, July 16, 2012

You scream, I scream, we all scream for.....

BS"D


You guessed it--ice cream!  As we are experiencing sub-tropical weather here in the northeast, we have been eating a lot of ice cream. When you look at the ingredient list, you may wrinkle your nose and say, "huh?" at the supposedly wholesome, all-American treat.  Do you really need mono and di-glycerides along with your double cone?   There is also the bigger issue of cross-contamination for those with food allergies/sensitivities,  as most companies offer cookie dough and nut flavored ice creams. Their equipment therefore is often not cleaned to the extent between runs of plain ice cream for those very sensitive. For Rosie, we have maybe one non-dairy, non-nut choice in the supermarket.  I do have to say that Turkey Hill and Klein's ice cream do an excellent job in providing allergen information on their web site or by phone.

 
I received an ice cream maker as a wedding present. I had grandiose ideas when I registered for it, however it's mainly taken up space in my cabinet. But I decided to put it to use last week and make a homemade, non-dairy ice cream.  I think it will be seeing a lot more daylight from now on.  If you don't have an ice cream maker, don't despair though. Click on this amazing recipe for ice cream that's so deep and rich without a machine. It's also very easy for kids to make  .


You can add different mix-ins and extracts as per your individual tastes. Try crushed gluten-free sandwich cookies or a half teaspoon peppermint extract instead of vanilla.

Chocolate-Chocolate Chip Vegan Ice Cream
8 ounces bittersweet or semi-sweet chocolate morsels
1 Tablespoon non-hydrogenated margarine
1 can (8-ounces) coconut milk (canned, not light variety), refrigerated 8 hours to overnight
¼ cup blue agave nectar
1 teaspoon vanilla extract
pinch of salt
1 pint (2 cups) soy cream (I used Trader Joe's brand) or Mimic cream or Rich's Whip, chilled
¼ cup chopped chocolate bar or mini-chocolate chips (I used an Enjoy Life boom-Choco-boom Bar)

In a medium sized microwave safe bowl combine chocolate and margarine. Microwave on high for 2 minutes. Stir until chocolate chips are completely melted. If not melted, microwave in 15 second increments stirring in between, until melted. Allow to cool 15-20 minutes.

Open the can of coconut milk and spoon out the solid white part of the coconut milk into a large bowl. The separation of the coconut milk into a solid and liquid will result when chilled as directed above. Use the remaining liquid for another purpose.* In a large mixing bowl, with electric mixer on medium-high speed, beat together coconut milk solid, agave nectar, vanilla and salt until fluffy. Add soy creamer and beat until combined.

Whisk one third coconut into cooled chocolate mixture. Fold chocolate mixture into remaining coconut mixture. Pour into bowl of ice cream maker and process as directed by manufacturer. Store in a plastic container in the freezer.

Note: If you don't have an ice cream cream maker you can pour mixture into a large plastic container and freeze one to two hours until crystals form on the top. Beat again with electric mixer on high. Freeze until firm. The ice cream will not be as creamy as in an ice cream maker.

Tip: Place a sheet of plastic wrap on top of ice cream in container to prevent crystals from forming in freezer.

Yield: 1 quart

*The remaining liquid in the chilled coconut milk works well in rice-- substitute for an equal part water when boiling the rice, in baked goods or in smoothies. Store refrigerated up to several days until ready to use.

Monday, July 9, 2012

It's so campy!

BS"D


Whether you are sending your child off to sleep away  or day camp, certain things remain the same for children with food allergies or sensitivities. Above all else they, and those responsible for them at camp, must do everything they can to keep them safe. I must borrow from the Scout's motto, "Be prepared", to express the best way to achieve your child's optimal safety while away from home.

First of all, prepare a memo to be given to the camp director, nurse, and counselors who will be dealing directly with your child. I use this one for Lillie, and include a list of problematic ingredients found on www.celiac.org, as well as a snack list, such as this one from www.dallasrock.org.

For Rosie, I have an allergy information sheet with her allergies and Epipen instructions in bold. I also include mine and my husband's cell phone numbers, so time isn't wasted going through the files to look this information up. I send a fanny pack for the counselor with her Epipen, asthma inhaler, Benadryl and a copy of the sheet.

I make sure to make an appointment too meet with the relevant people, before camp begins. The first day is usually chaos, and that is not the time to teach a 16 year old counselor how to use an Epipen for the first time.Take your kids, or a picture of them, when you meet with director/counselor, so they are familiar with your child.

This year I purchased very cute medic-alert necklaces. I include their allergies, sensitivities, name and home phone.  Lauren's Hope has a great variety of products sure to please any child or adult. The classic medic- alert bracelets and necklaces are kind of boring for a child, and in turn, they may be reluctant to wear them...add a princess or some funky beads, and now they've got bling!  The plastic bracelets are also an appealing solution for many children. My highly food allergic babysitter recently told me how she saved a 3 year old from popping a peanut chew at a party recently when she recognized the child's plastic "Peanut Allergy" wrist band.

Lauren's Hope is giving reader's of this blog 10% off your order with the code GLUTENFREE on the check out page.  I really feel more at peace of mind when my children wear these necklaces.

Pack appropriate snacks.  My daughters' camp provides two snacks a day. I spoke to the counselors about giving my kids the snacks they can have, but on any given day there may not be appropriate choices. Rosie likes to play it safe and stick with what I pack either way.


Luna bars has recently come out with Luna Protein Bars that are gluten free. They do have allergens such as peanuts and tree nuts, so check if it suits your child's needs. But for those that are only dealing with a gluten free diet, they are a great choice.  The new flavors include cookie dough, chocolate cherry almond and chocolate peanut butter. These are great to send along a bunch for sleep away kids or in a lunch for a day camper. It can be a real pick-me-up during a hike or just a long day.  Be considerate and check with your child's camp regarding restrictions in terms of nuts. 

Don't forget to send those special homemade treats. Today there are a number of camps just for celiac kids, and others that are training their cooks regarding food allergies and special diets.Whether you are sending your child to one of these camps or not, I strongly suggest you speak to other parents whose children have similar concerns to your's and get their recommendations on specific camps.  A R.O.C.K. support group is a good place to start. Although many camp directors think they can accommodate your special needs, you need to know it is not just theoretical, and ensure that there is follow through.


Sending pre-made meals and baked goods is a good way to ensure your child won't go hungry if there is a mix-up. I am a huge fan of vacuum sealers for meals. They can be re-heated as a boil in bag or in the microwave. They keep food fresher longer and avoid cross contamination on re-heating. Food does need to be frozen or refrigerated if it normally would be stored that way. A vacuum sealer doesn't make perishable foods shelf stable.


I discovered an amazing brand of flour that's "new to me" called Domata.  As readers of this blog know, my past favorites were Jules and Better Batter. They have been dethroned.  I found that for some applications like cakes Jules was better and for some like bread, Better Batter was the one to use. With Domata, I only need one now to achieve a perfect texture in my baked goods. I tried it in cream biscuits, cookies and cake and the texture was really perfect without any funny smell, (as is common in gluten free flour), or gritty (ditto)! When I bit into my chocolate chip cookies I had a flashback to "regular" Toll house cookies for a moment. Domata is available online at Amazon.com, as well as in some stores. Check their website for details. If you purchase through Amazon on a regular basis, you can take advantage of the subscribe and save program.  Domata is also cheaper on Amazon, at least, than the other all purpose flours which I order online. The flour contains xanthan gum and is a "cup for cup" substitution for all-purpose flour in recipes. I also use it as a substitution for gluten free recipes that call for a number of different flours and xanthan gum. Simply add up all the measures of various flours in the recipe and omit additional xanthan gum.


With some legwork and a good attitude, your child with special dietary needs can have a great camping experience along with their peers...enjoy the summer!
 
This recipe is great for a lunch, or to send individually wrapped and frozen for your sleep away child to store in the camp kitchen. These muffins are gluten free, vegan and nut free.

Chocolate Chip Banana Muffins

2 cups all-purpose gluten free flour blend with xanthan gum (such as Domata)
2 tsp. baking powder
2 tsp. baking soda
1 tsp. salt
1 1/2 teaspoons cinnamon
1/2 cup canola oil
2/3 cup blue agave nectar
3/4 cup soy or rice milk
1 tsp. vanilla extract
3 medium very ripe bananas, mashed well
1 cup chocolate chips

Pre-heat oven to 325F degrees. Place paper cupcake liners in 2 standard sized muffin pans (this recipe yields 18-24 muffins depending on size). Spray lightly with non-stick cooking spray.

In a large mixing bowl, whisk together first 5 ingredients. Make a well in the center of the dry ingredients and add next 4 ingredients. Stir until well combined. Add bananas and stir until well combined.  Stir in chocolate chips.

Fill muffin cups 1/2 to 3/4 full. Bake for 30-35 minutes. The centers should no longer appear "wet" and should bounce back when touched when done. Completely cool on wire racks.

Freeze in zip top plastic bags, if desired.

Yield: 1 1/2 to 2 dozen muffins

Note: Use the brownest, yuckiest bananas you can find...the ones no one wants to eat anymore!


Monday, May 21, 2012

Little things Mean a Lot


BS"D


In the past decade, small desserts have made a big impact on our culinary consciousness.  Cupcakes, cake pops, donuts, and whoopie pies have all been front and center in this movement.  Artistic displays at weddings and parties include beautifully crafted individual desserts, trifles in shot glasses and even slices of ice cream that look like sushi.

What's great about these little treats, in my opinion, is that you get variety, big flavor impact and best of all less calories than their full sized counterparts. If you have one cupcake for example, when it's done, it's done; no shaving off slices of a big cake to "even things out". You can also sample a few different desserts for the same caloric impact of one regular sized dessert.  Plus they are just cute!


I recently made key lime pie without the actual pie part. I am totally in love with my ramekins, and think just about anything you make in them is attractive.  So I decided to just bake the best part of the pie--the filling-- in the ramekin. The result was something that tasted like a cross between a mousse and a souffle. The taste...divine!  It had the full flavor impact of key lime pie, yet spared me of a couple of hundred calories from the crust.


So mix it up this Shavuot and try baking your cheesecake in ramekins, serve with fresh fruit and whipped topping for a lighter dessert.  You can also make cheesecake parfaits by baking the cheesecake filling in a 9x13 inch pan for about half the time specified in the recipe, then layer it with fruit filling in tall shot glasses or mini parfait cups.


For something new, check out my Tropical Breeze Mango-Coconut Cheesecake on Eaglebrand.com!


Enjoy and Chag Sameach!


This recipe calls for seemingly long beating times for the eggs and sweetened condensed milk, but it is worth it! The result is the absolutely fluffiest key lime pie filling ever.

 Key Lime Dessert Cups

This is adapted from a recipe for Key Lime Pie from The Beachwalk Cafe featured in Relish magazine.

4 large egg yolks
1/2 Tbsp. of grated lime rind
1 (14 ounce) can sweetened condensed milk (light version is fine)
1/2 cup fresh or bottled lime juice (not concentrated; I use bottled key lime juice)
1 cup chilled whipping or heavy cream (optional)
2 Tbsp. powdered sugar (optional)
1 lime sliced thinly, for garnish

Pre-heat oven to 350F degrees.  Spray 6-8 4-or 6-ounce ramekins with non-stick cooking spray and set on a cookie sheet.  Set aside.

In a large mixing bowl, beat egg yolks and lime rind on high speed for 8 minutes; the eggs will appear light yellow and fluffy. Slowly add sweetened condensed milk and beat an additional 7 minutes.  Add lime juice and beat 2 minutes more.

Pour batter into ramekins within 1/4-inch of top of each ramekin.  Bake for 10-12 minutes, until set.  Allow to cool, then chill 8 hours. 

Beat chilled whipping cream with powdered sugar on high with electric mixer until stiff peaks form. Chill until ready to use.

Top chilled key lime cups with sweetened whipped cream and lime slices.

If you desire a "full sized" dessert, you may pour key lime filling into a coconut crust, and bake as above for 12-15 minutes.

Sunday, March 11, 2012

New and Noteworthy for Passover


BS"D

Given that this is an extremely busy time of year, I like to look for "shortcuts". We had a family emergency this year that took me away from home and Passover preparations for almost a week, up until 2 days before the holiday. I most appreciate shortcuts and easy dishes this year.

Some new finds that helped me along the way are some wonderful new products and a new,healthy passover cookbook. Although you may not always associate healthy with all the traditional holiday fare-- it can be done. Preparing lighter dishes gives you balance so you can have 1 or 2 heavier dishes. It is also great to prepare the lighter meals during chol hamoed so you are not overindulgent the entire 8 days of Passover.


Bonnie R. Giller, MS, RD, CDN, CDE is a nutritionist who decided to show the world that you can put a healthy spin on tradition. In Passover The Healthy Way, she presents soups, meats, kugels and dairy dishes that are lightened up from what we usually expect for the holiday. The addition of more fruits and veggies, like her delicious Acorn Squash with Apple Filling, makes it easy to work our "5 a day" into holiday meals. Ms. Giller opts for egg whites, healthier oils, like olive, and lower sodium broth in more traditional dishes like kugels. These simple changes preserve the flavors we grew up with, at the same time they preserve our waistline!

She presents many gluten free choices such as Potato Onion Pie, Salmon Cakes with Yogurt Dill sauce, and Grilled Orange Chicken Salad---just to name a few that appeal to my tastes. Passover the Healthy Way is worth a look to bring some fresh ideas into your holiday repertoire.


As for new products, many of you may have tried and loved the Yehuda Gluten-Free Matzo Style Squares last year. They are made with potato starch, so you do not make the blessing of Hamotzi on them, as you would do for oat matzo. As such, they should not be used for matzo during the seders or Sabbath/yom tov meals. However, in between they are great! This year Yehuda launched onion flavor squares, and they are really good! Stock up because these fly off the shelves. If they are not available in your local stores, they can be found online at a number of gluten free retailers.

Manischewitz threw its hat into the gluten free ring this year with a number of gluten free products, including GF cake mixes, both yellow and chocolate cakes. Having grown up with the Manischewitz cake mixes being a constant presence in my home this time of year, I am excited that I can now make them for my kids with the new gluten-free variety. Warning: they still make mixes with matzo meal, so check to make sure you are buying the gluten-free variety made with potato starch.

The Manischewitz spiral and shell shaped pasta adds a new twist, literally, to your Passover meals. You can now have favorites like shells and cheese or a nice veggie pasta salad with these products. As always, the wide variety of flavors of Manischewitz macaroons are gluten free.

Last but not least, you cannot miss out on Guiltless Gourmet Crunches. I tried the Toasted Almond Crunch. Somehow they managed to make a non-dairy nut and caramel crunch candy taste like it was made with real butter. The flavor was nutty and buttery yet--guiltless! Providing you are not nut allergic, the Guiltless Gourmet Crunches fit well into a gluten-free and casein-free diet.

Potato Onion Pie

from Passover the Healthy Way by Bonnie R. Giller, p. 107

3 onions, chopped
1 Tbsp. olive oil
2 lbs. potatoes, peeled, just boiled and still warm
Salt, to taste
Black pepper, freshly ground, to taste
3 Tbsp. potato starch
1 egg
4 egg whites
2 cups plain yogurt, nonfat
1/4 cup parsley, minced

1. Pre-heat oven to 350F degrees. Spray a 10-inch pie plate with non-stick cooking spray.

2. Saute the onions in the olive oil until softened and sweet, about 20 minutes.

3. While the onions cook, mash the still-warm potatoes with a potato masher or a fork. Add the potatoes to the onions, combining well. Add salt and pepper to taste.

4. Add the potato starch, stirring well to incorporate it completely. Add the eggs, egg whites, yogurt, and parsley.

5. Pour the mixture into the prepared pan and bake for 40 minutes, or until the top is lightly browned. Serve hot or at room temperature.

Yield: 10 servings

Note: When it is not Passover, you may substitute soy yogurt or silken tofu for the yogurt in the recipe.


Along with the idea of "all in moderation", here is a sweet treat to cap off your meal. I suggest using the Yehuda Gluten-Free Matzo Style Squares for this, as oat matzoh is very soft and crumbly.

Matzoh Brown Sugar Buttercrunch
from Holiday Candy and Confections by Dede Wilson, p. 78

5 whole lightly salted matzohs
1 cup (2 sticks) unsalted butter (or Passover margarine), cut into pieces
1 cup light brown sugar
8-ounces semisweet chocolate, finely chopped

1. Pre-heat oven to 350F degrees. Coat a jelly-roll pan with nonstick cooking spray. Place matzohs side by side in pan, breaking them to fit so that the entire surface of the pan is covered.

2. Cook butter and sugar in a small saucepan over medium heat, stirring often, until butter melts. Bring to a simmer, and simmer mixture for 5 minutes.

2. Immediately pour brown sugar mixture over matzohs, covering them completely. Spread mixture around with an offset spatula if necessary.

4. Bake for about 12 minutes or until bubbly and edges are starting to turn golden brown. Remove from oven and place on cooling rack.

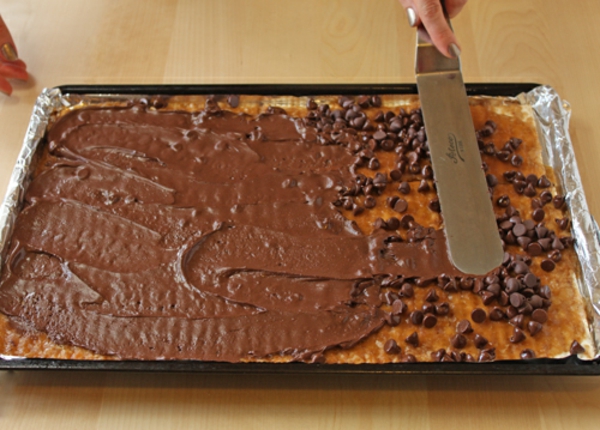
5. Immediately sprinkle chocolate over surface of matzohs. Let sit for about 3 minutes or until chocolate has softened, then spread chocolate all over the surface with an offset spatula. Chill until chocolate firms, about 30 minutes. Break into pieces.

You can sprinkle wet chocolate with chopped nuts or coconut.

Wednesday, February 29, 2012

Think Outside the Lunchbox

BS"D

So the 100th day of school has rolled around, and apparently it's a big deal at school. There are all sorts of 100th day activities across the curriculum. To me it represents a 100 lunches made. Some children are happy with the same lunch every single day, and some kids hate their lunch every single day. I have a mix of both. But there are ways to "refresh" your lunch box without using vastly different ingredients than usual. It's a matter of re-framing, so to speak, the lunch items.

Author Adrian Fiorino did just that with his book Insanewiches: 101 Ways to Think Outside the Lunchbox. He creates sandwiches in the form of computer mice, artist's palettes, Pac-man, and all manner of creatures great and small. His tools are probably right in your refrigerator, luncheon meats, cheeses, spreads and bread. Gluten free bread and rolls generally work perfectly fine for these edible sculptures. He even includes a waffle-wich. A favorite when I'm running out of the house in a hurry in the morning-- made easily with Van's gluten Free Waffles.


Check out Adrian Fiorino's site www.insanewiches.com. Currently there are sandwiches with the bread cut into hand shapes...very cute idea. You can even roll out dough on a cookie sheet and trace your children's hands on the dough with a toothpick then cut out. I find gluten free dough to be very soft, and have even put it into a ziploc, cut a 1-inch hole in the corner and piped it onto a cookie sheet. This works well for shapes and letters.


The publisher has generously agreed to give one reader of this blog a copy of Insanewiches. Just leave a post below with an email or web address to contact you, between now and April 15th. A winner will be chosen randomly.

Another great idea
is to put cubes of food on skewers or popsicle sticks. Party stores sell some interesting toothpicks and swizzle sticks for a colorful lunchbox. If you have the type of child who is likely to use a toothpick or skewer as a weapon, use popsicle or lollipop sticks!

A great little book I found called On a Stick! 80 Party Perfect Appetizers by Matt Armendariz. Has some novel ideas (not just for cocktail party fare) including orange beef, chicken and waffles, and even spaghetti and meatballs on a stick!

So no matter what you do to perk up lunchtime for your kids, remember to make it fun...mix it up. And, don't forget a little note that tells them you love them.

BTW: The very cool lunch box pictured above that folds out to a place mat (perfect for avoiding cross contamination on lunch tables) is from www.lunchsense.com.


These cheese and tomato sticks are very kid friendly and easy for them or you to make!

Caprese Sticks
From On a Stick! by Matt Armendariz , p.35

12 cocktail picks
1 cup small fresh mozzarella balls (or chunks of soy cheese or tofu)
1/2 cup cherry tomatoes
1/2 bunch fresh basil leaves
Sea salt and extra-virgin olive oil (optional)

1. Arrange mozzarella balls, both kinds of tomatoes, and basil leaves on cocktail picks, mixing and matching in varied combinations.

2. Before serving, sprinkle with sea salt and a quick drizzle of olive oil, if desired.

Monday, January 30, 2012

For the Health of It


BS"D

I find that Americans are not so good with moderation. I get a number of cooking and family magazines, and found that in December we were instructed to indulge in gobs of sweet treats and rich meals. They also instructed us to make any number of craft products to clutter our homes, not to mention tips on acquiring more "stuff" to give as gifts. Then after filling our bellies and homes with a lot of things we didn't really need in the first place, the January magazine covers shout at us to organize, exercise, and eat right. So in this vein, I will give my 2 cents for eating right, not just in January, but hopefully all year. And in order to not "clutter" your lives I will show you how to do it very conveniently. It is important to show our kids that moderation is the way to go and that healthy doesn't have to be boring or bland.


Start your day right...
My family was already a fan of Erewhon Crispy Brown Rice- Gluten Free Cereal, an essential ingredient in our favorite Chunk-a-Chews recipe, but recently I received some samples of other Erewhon cereals, which we just love! The Erewhon Corn Flakes list organic milled corn and sea salt as the only ingredients. I was quite taken aback when I saw this. How could there be no sugar, corn syrup or a half dozen preservatives like other corn flakes? Well there aren't and they taste great. The kids really liked them, and it was the first time (I think) they had corn flakes, as it is very hard to find national brands without barley malt. You can taste the delicate flavor of the sea salt in the flakes, and they are crisp and crunchy. I really feel good about serving these cereals before I send my kids off to school.


Snack right...
School lunches are always a challenge for me. Each child gets something different due to their own allergies/sensitivities and overall preferences. For example, Rosie will only eat sandwiches if made on rice cakes. The child hates bread. The snacks in the lunchbox seem to make or break it. Of course they want "junk", chips, cookies, etc. But their school frowns on these types of snacks as do I. When I received a bunch of That's It bars to sample, I thought I may have hit pay dirt. They look like a granola or power bar, but they are not loaded with sugar or artificial anything trying to masquerade as healthy, they ARE healthy. Each bar contains the equivalent of two pieces of fruit.. and as the name implies, that's it! Somehow they've managed to chop, dry and form these two pieces of fruit into attractive and convenient little bars. They come in Apples and Cherries, Apples and Apricots, and Apples and Pears flavors. The bars are softer than regular dried fruit, and have a slight tang as they are not sweetened with sugar. They are great for kids who play sports and need a boost, as they can easily fit in a pocket (or my purse).


Cook right...
After a long day of school the kids clamber into the kitchen and want food. Their first thought is for snacks, and my first thought is dinner is soon, I don't want them to snack. When an acquaintance told me she serves her young kids dinner at 4:30 when they first get home from school, I balked. But she explained that this way they can have something nutritious and filling before doing their homework, and since they go to bed around 7:30 or 8 pm, this dinner time is perfectly reasonable. I see that if I have dinner ready by 5 pm, they will fore go the foraging for snacks and eat more substantially. Levana Kirschenbaum, the culinary mastermind behind Manhattan's Levana's restaurant and several great cookbooks, has come out with a new book entitled The Whole Foods Kosher Kitchen: Glorious Meals Pure and Simple. Along with Lisa R. Young, PhD, RD, they try to show the reader that healthful eating has to be neither boring or laborious. Levana cooks with family in mind, and the book is peppered with pictures of her adorable grandchildren. She includes codes next to the recipes to show which ones are gluten free and notes to indicate how to adapt certain recipes for the gluten free cook. There are eye-catching photos for contemporary recipes like Cold Red and Yellow Pepper Soup, as well as more tradition Moroccan dishes like Chraimi, (fish cooked in a traditional Moroccan style). The book is chock full of recipes that will get your family eating veggies and other nutritious ingredients. My one warning to the gluten free eater/cook is to make sure all your ingredients are gluten-free. For example, there is a recipe for Mock Crab Salad, however I have only seen Surimi (mock crab) which contains gluten as a binder. So that made me wonder if the authors stuck the "gf" tag on recipes they assumed were gluten free without having a true, in-depth knowledge for this way of cooking. And, more an opinion than a warning, Levana indicates she favors chick-pea flour in her gluten free baked goods. Those of us who eat gluten free baked goods all the time know that there are tastier alternatives to the bean flour, which lends a very particular flavor and texture to baked goods. But apart from these issues, I still think this cookbook provides a ton of luscious, healthy recipes, which would be a great addition to your family's repertoire of meals.


This recipe was picked by Silvana Nardone as the winner in Attune Foods December recipe contest. It's a great, inexpensive way to make crunchy, gluten free breadcrumbs.

Italian Style Gluten Free Breadcrumbs
from www.attunefoods.com

Ingredients:
1 - 10oz. box Erewhon Crispy Brown Rice Cereal, finely crushed
1/2 cup dried parsley flakes
1/3 cup dried basil flakes
1 teaspoon garlic salt
1/4 teaspoon ground black pepper
1/2 cup grated Parmesan cheese (optional)

Directions:
In small batches, finely crush the cereal. I have a coffee bean grinder that I use exclusively for spices and food items. This works great. However, if you do not have a grinder, you can simply place the cereal in a large resealable bag and use a rolling pin to finely crush the cereal.

Place the crumbs into a large bowl. Add all the remaining ingredients to the bowl and thoroughly mix together.

Place the breadcrumb mixture into a mason-type jar.

Sunday, January 15, 2012

A Dash of Delicious


BS"D

I was thumbing through a book catalog recently, and I saw a spate of new kosher cookbooks. Hmmm. SO many new ones are coming out, I thought,"Are any of them going to offer me something new?" Well the Dash cookbook created by Rebecca Naumberg and Sori Klein as a fundraiser for Torah Academy for Girls in Far Rockaway, New York is different. Not only does it raise the bar on school fundraising cookbooks, it presents kosher cooking in a new light.

Although many of the recipes look as if they would be complicated to prepare, none of the recipes (as far as I could tell) extend beyond one page. They force the kosher cook to look outside the box and bring contemporary culinary ideas into their home. There are some old favorites mixed in as well. The recipes bring in flavors from many international cuisines, contain recipes from professional chefs interspersed with home cooks. They also provide "plan ahead" and "simplify" tips that make the recipe easier when you are rushed.

For the gluten free cook (or eater) there are quite a lot of options in Dash, such as Quinoa with Balsamic Roasted Vegetables, a terrific meat section, and even desserts like French Macaroons with 3 fillings, Chocolate Semifreddo and fresh fruit sorbets. The cold soups especially caught my eye, as I'm a big fan. The Chilled Avocado Gazpacho with Spiced Pumpkin Sees has a nice contrast of warm spices with the cooling elements of avocado---they even give non-dairy substitutes for this one!


Visually the book makes an impact. Food styling, although done by the parental body of the school, it seems, looks very professional. My one gripe is that all of the photos are against a black background. I would have liked some variation, as it is a thick book and the black background is sort of a single note. But it was photographed beautifully.

If you are interested in ordering the book send an email to: cookbook@tagschools.org. The cookbook is an entirely non-profit endeavor, and all proceeds go to the school.


Since Rosie can't have eggs, I tend to make a lot of roast potatoes instead of kugels. This recipe caught my eye because of all the garlic---something I absolutely love, especially roasted. The lemon juice gives it a very bright flavor. Gremolata is an olive oil and herb condiment used in the Mediterranean to finish meats and other roasted dishes.

Potatoes Gremolata
from Dash by Rebecca Naumberg and Sori Klein, p. 207

2 pounds baby or fingerling potatoes

1/4 cup olive oil
6 cloves garlic, unpeeled
3 cloves garlic, minced

Gremolata:
3 Tablespoons extra-virgin olive oil
Zest of 2 lemons
3 Tablespoons fresh lemon juice (from 2 lemons)

2 Tablespoons fresh parsley leaves, chopped
1 Tablespoon fresh thyme leaves, chopped
Kosher salt and fresh ground black pepper, to taste

Potatoes: Preheat oven to 400F degrees. Place potatoes in an 8-quart stockpot with enough cold water to cover by at least 2 inches. Bring the water to boil over medium heat and cook until potatoes are tender when pierces with a fork, about 25 minutes. Drain and allow to dry for 5 minutes.

Roast: Place potatoes in a roasting pan. Add oil, whole garlic cloves and minced garlic. Bake for 45 minutes. Meanwhile, combine all ingredients for gremolata in a small bowl. Sprinkle potatoes with gremolata and toss to evenly coat potatoes. Return to oven and bake uncovered for another 15-20 minutes. Transfer to a serving bowl and serve.

Serves: 6

This recipe is pictured in the book served in artistically angled shot glasses. This idea is great for cocktail parties and buffets, wherein you would not normally serve soup. This recipe is vegan when made with soy sour cream.

Chilled Avocado Gazpacho with Spiced Pumpkin Seeds (pepitas)
from Dash by Rebecca Naumberg and Sori Klein, p. 44

2 Tablespoons olive oil
1 white onion, sliced into rings
2 1/2 cups low-sodium vegetable broth, or more as needed
3 medium ripe avocados, peeled, pitted and cut into large chunks
1/2 cup cilantro, chopped
1/4 cup parsley, chopped
3 Tablespoons fresh lime juice
1 teaspoon ground cumin
1 teaspoon ground coriander
1 teaspoon kosher salt, plus more to taste
1/2 cup sour cream or pareve tofu sour cream
Freshly ground black pepper, to taste
Spice Pumpkin Seeds

Heat olive oil in a medium skillet over medium-high heat. Add onion and saute until translucent, about 6 minutes. Remove from heat and transfer to blender.

Puree sauteed onion together with broth, avocados, cilantro, parsley, lime juice, cumin, coriander and salt. Blend in sour cream and season to taste with more salt and pepper. Refrigerate covered for at least 2 hours. Thin the soup with broth if necessary. Ladle into bowls and garnish with Spiced Pumpkin Seeds.

Serves:6

Spiced Pumpkin Seeds

1 Tablespoon olive oil
3/4 cup raw green (hulled) pumpkin seeds
3/4 teaspoon ground cumin
pinch of cayenne pepper
pinch of kosher or coarse sea salt

Heat oil in a small skillet over moderately high heat. Add pumpkin seeds and cook, stirring constantly, until seeds begin to pop, 1-2 minutes. Stir in cumin and cayenne pepper, and continue to cook, stirring until fragrant about 30 seconds. Transfer to a bowl and season with a generous pinch of salt.